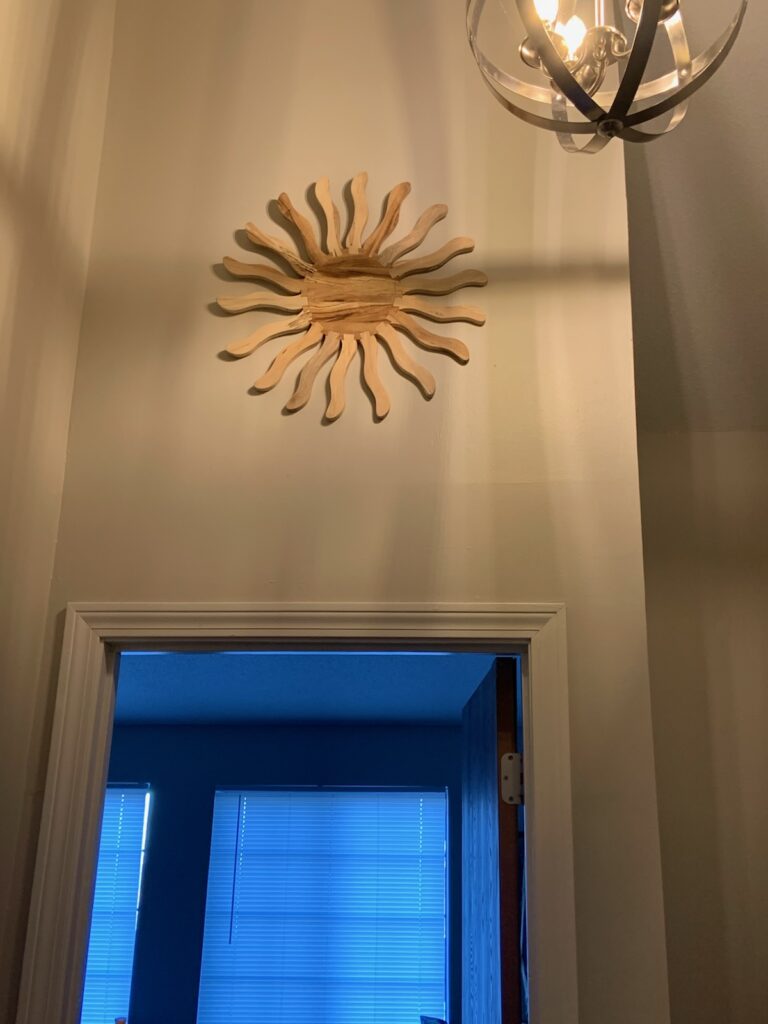
Let’s start today’s update with some sunshine. Well, it’s wooden sunshine, but still 🙂
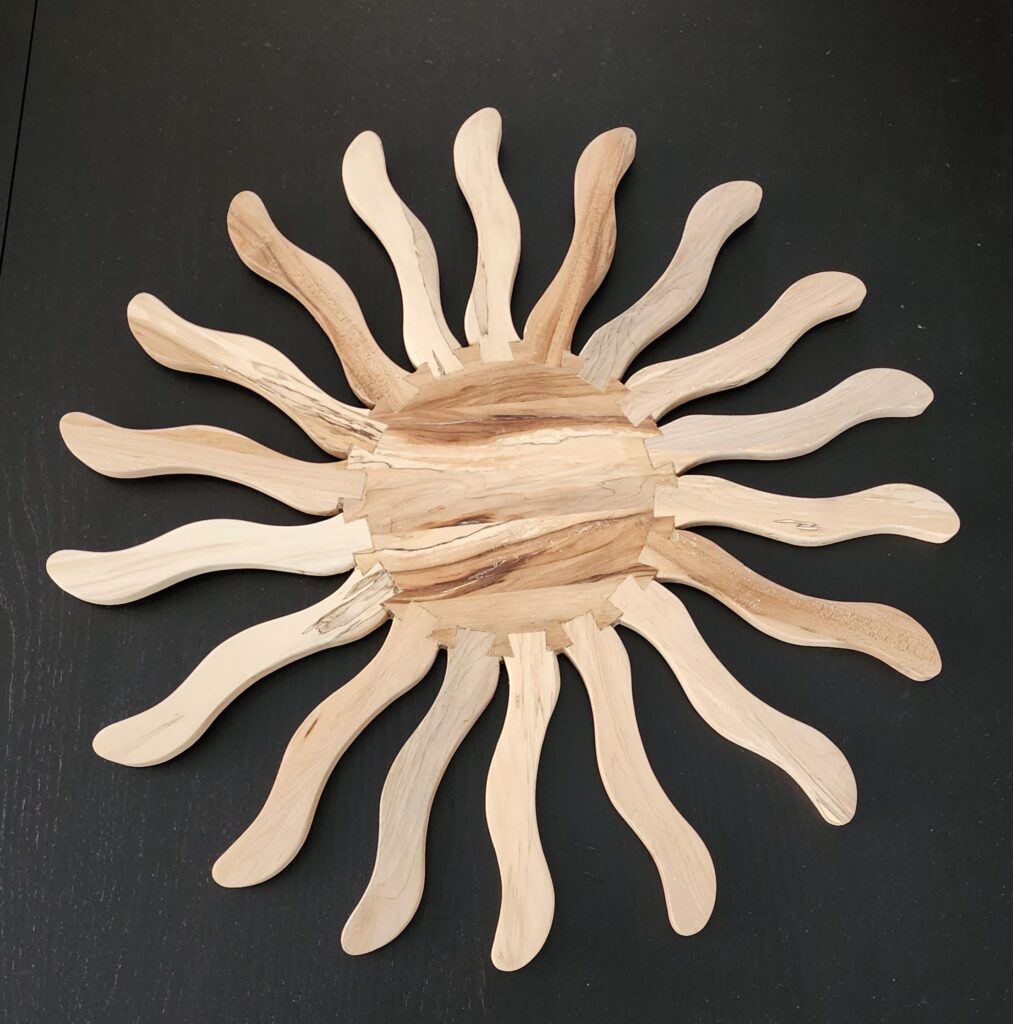
This piece of art is about 24″ across, for scale, and was made from wood harvested from trees that grew here. It was a long journey from tree to log to board to parts to art.
One of my current foci with my woodworking is to improve safety and accuracy by using fixtures and jigs (is there a difference?) whenever possible. Something to hold the work, keeping my body parts away from the machine parts. Something to guide the work or the machine exactly. That kind of thing. Shaping the sun rays was just such an occasion. For this, I built this little clamping fixture that holds small parts securely while letting me keep my fingers well away from cutting tools such as this router bit, spinning at over 10,000 RPM with razor sharp carbide edges.
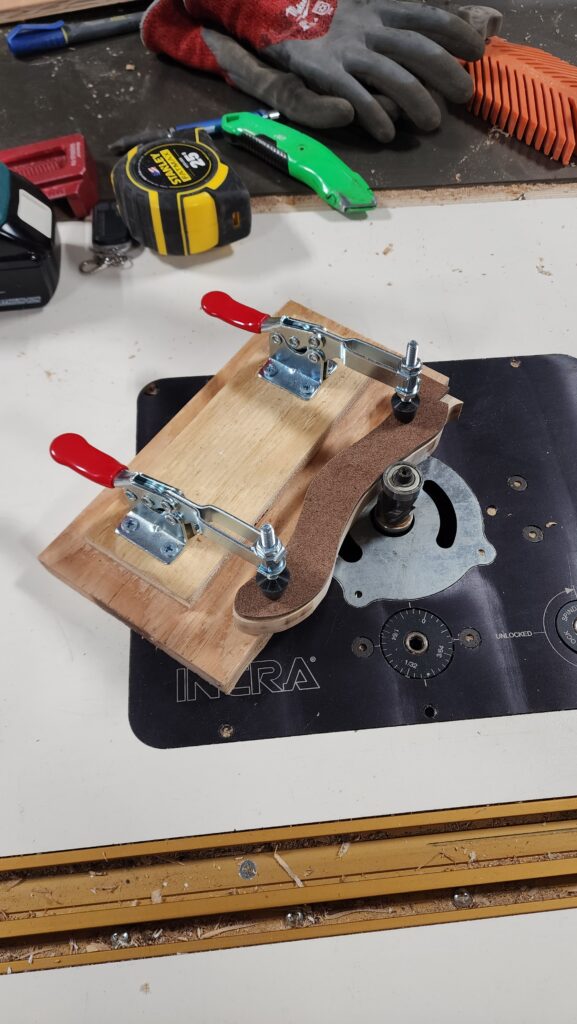
Also a fine example of improving accuracy – the brown piece is a template affixed to the top of the workpiece. The smooth wheel on top of the cutter traces the profile of the template and cuts the workpiece to the exact contour. This meant I only had to shape one part precisely (the template itself) and all the others could be made rapidly this way.
The dovetails that mate the rays to the face of the sun were another story. Those all had to be cut by hand and that proved to be quite difficult (my first dovetails). Each one was individually fit. Hence the numbered markers.
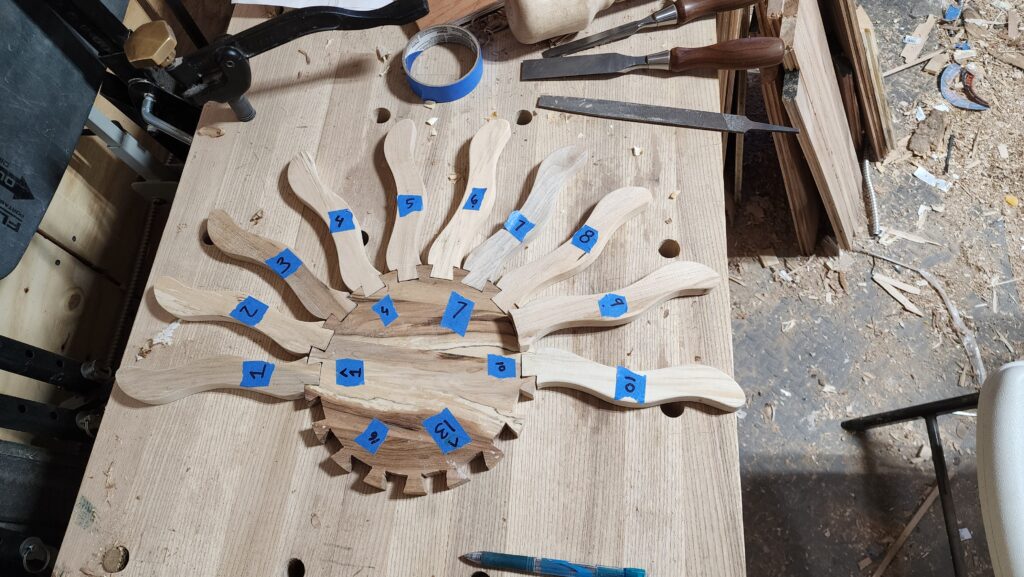
It occurs to me now that I might have been able to build fixtures (including a rotationally indexed one for the face) for this task as well, but it’s too late now…
That was dust #1 (sawdust).
Dust #2 was in the air in the house! See that lighter band on the upper part of the cloth wrap of this air cleaner?
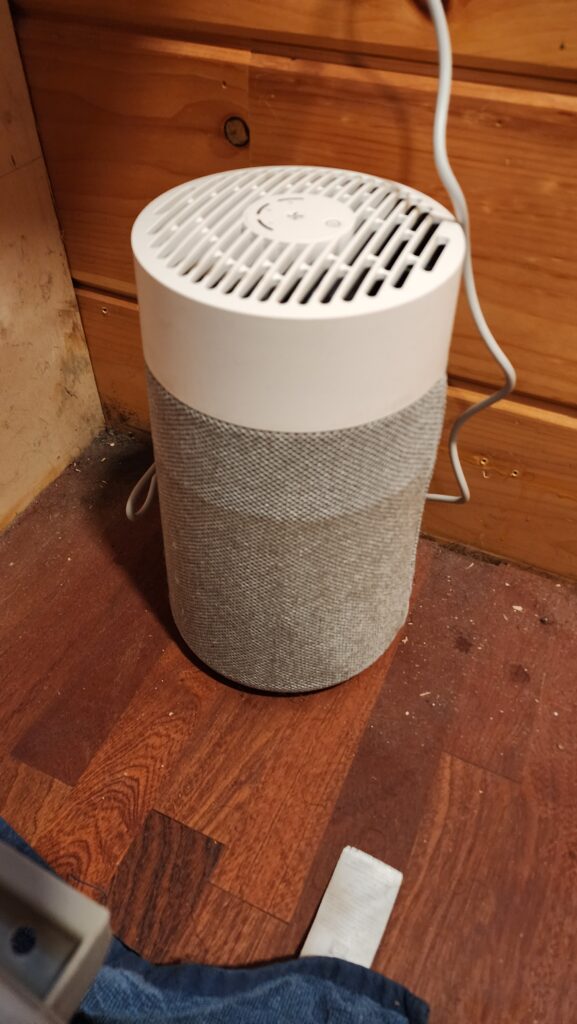
That’s the part of the wrap that does not encounter airflow – its decorative. The lower part that is much darker, that’s the first stage of the air cleaner’s operation. It’s quite fouled with dust. It is also chiefly sawdust, also from the woodshop, but indirectly. This is in the house. How did the sawdust get here? From the compost toilet system! Every time the toilet is used, a scoop of sawdust is thrown in… and some fine particles get into the air. And my lungs. I didn’t realize that a lingering cough wasn’t just my body having trouble shaking a virus but was in fact environmental. Then I took a vacation for 10 days and my respiratory health improved almost immediately. Then I came home and the cough came right back. AHA! It’s environmental! So then I went around doing everything I could think of to improve the air. And it worked. This air cleaner pre-filter is proof there was stuff to clean.
I used to get mold on the window sills (where condensate from the cold glass would pool) in the winter, as well. Not after I installed the air cleaner. Looks like it was catching some mold spores, too. Excellent.
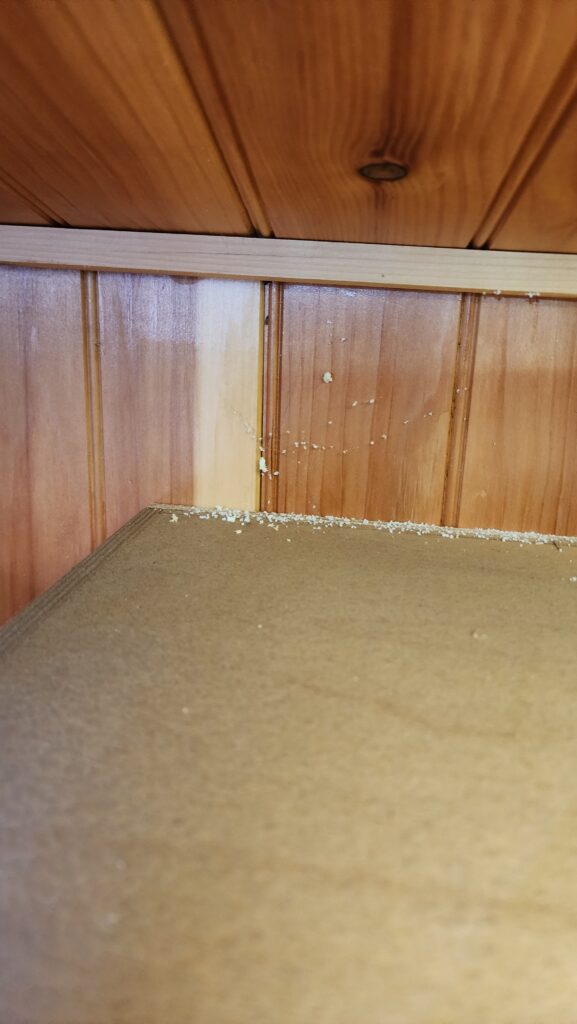
Dust #3 was a lot more concerning.
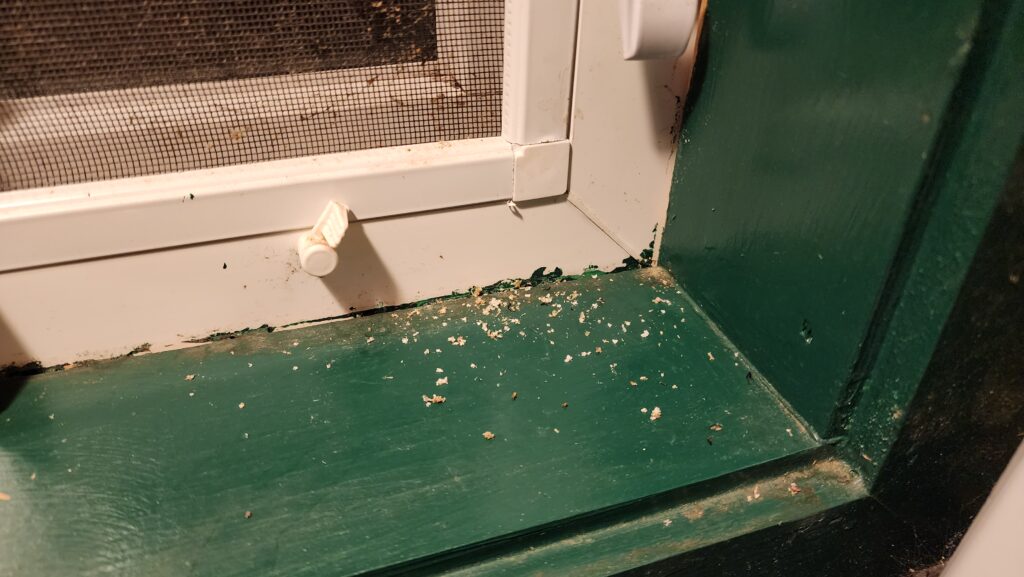
What’s all this, aside from poor application of masking tape when I painted the window trim green years ago? These crumbs are exactly the same color as the spray foam insulation in my house.
WHUT?!
How did they get there?
Carpenter ants is how.
Shit.
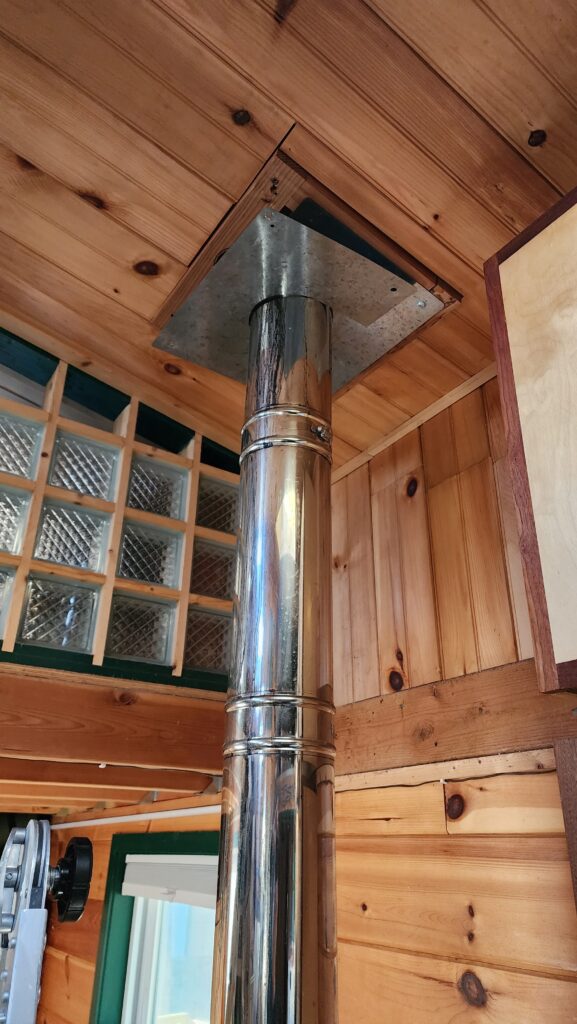
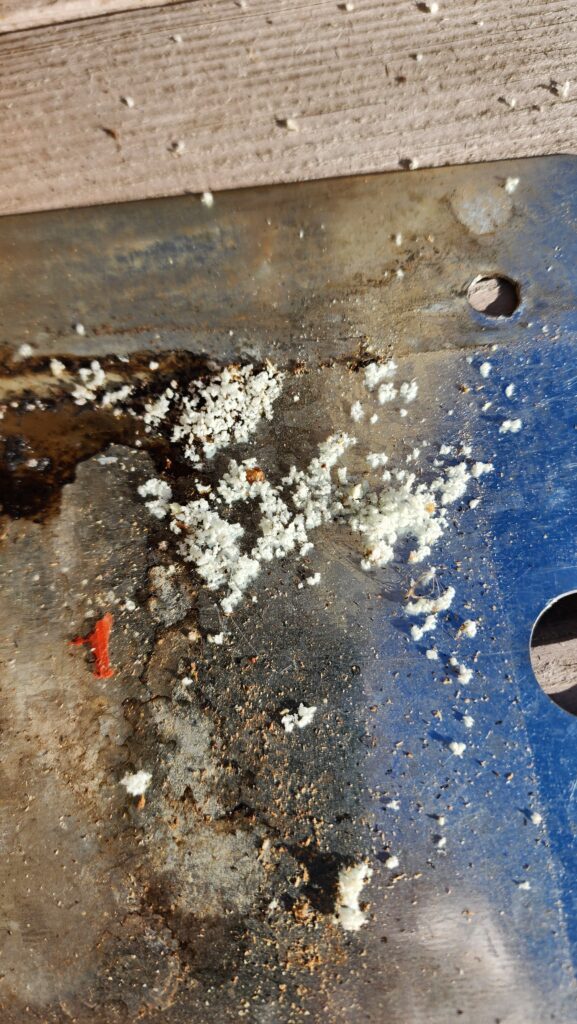
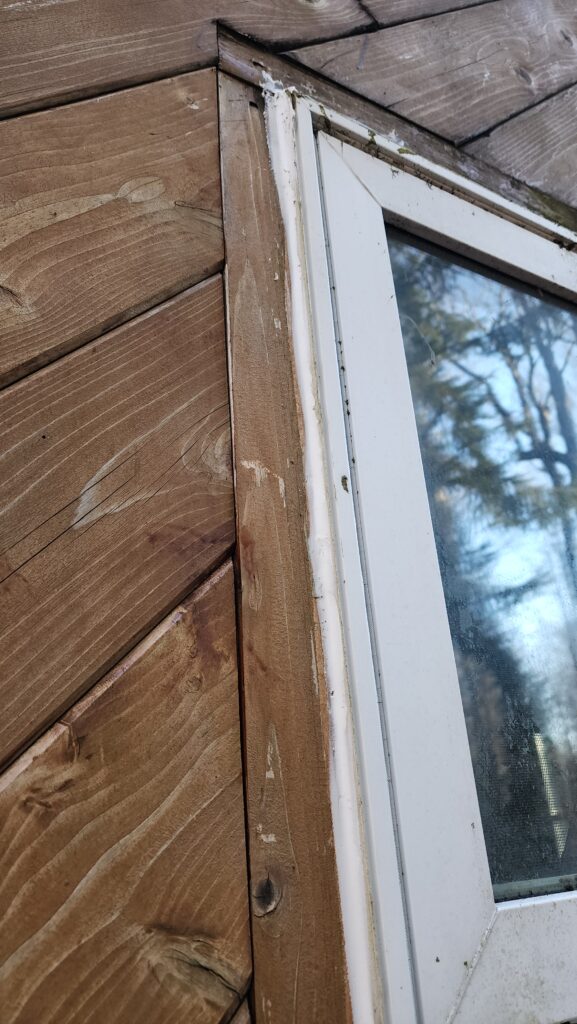
A quick inspection showed they were active in a few different places. Like up here…
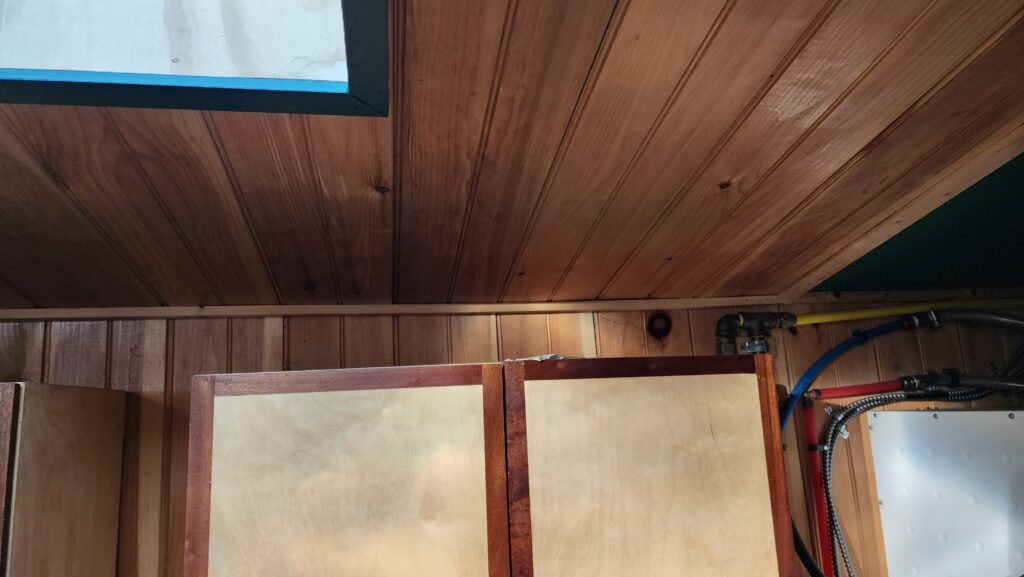
And up here, atop my high cabinets…
I have engaged a pest control company for this one. So far, mixed results. No more dust, but still plenty of ants. They’re due back soon for a second treatment. I have another company standing by as backup if the first one can’t get it done.
Meanwhile, I went looking for reasons they might be here in the first place, aside from the obvious: I live in the woods and there’s plenty of reason for wood-eating ants to live here, too.
I know there were ice dams around the skylights, causing water ingress earlier this year. That will make the wood attractive to the ants. Also, it turns out the caulk around my windows was in disrepair, no doubt letting water in behind it. Definitely in need of a fresh application!

There, we go. Now, the sheathing behind the siding and the window are textured to allow any water that might get back there to drain/dry, but I don’t think it was intended for more than trace amounts, not what might come in from a failed caulk seals. I’ll need to spend some time on the house exterior when the weather improves.
Speaking of weather – winter has been holding on like a clingy ex this year.
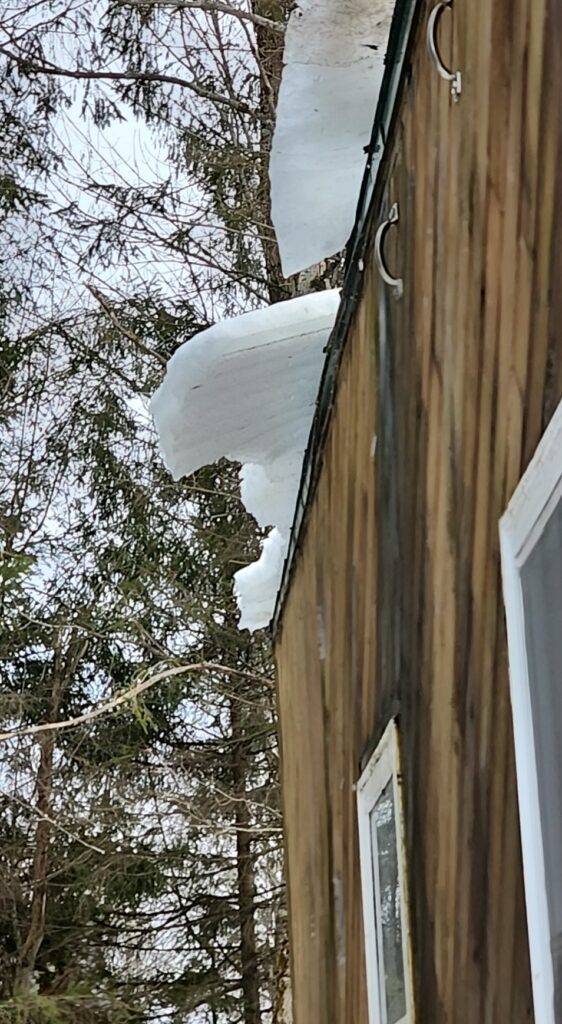
This includes the usual periodic avalanche of snow from the workshop roof…
See that piece of lumber laid out on the right? That’s 8ft long! It’s not uncommon for snow to fall from the roof into a minor mountain right in front of the doors, but this time the snow must have flown off the roof to land well beyond 8ft from the roof’s edge! I’m glad I wasn’t anywhere near it when it happened.
I had another case of frozen fuel filter on the tractor, too. I promise I was using the recommended amount of winter diesel fuel treatment. Well, after that, I’m using 2x as much. This time, Bob froze up in subfreezing weather in the middle of my road, after running fine for like 15 minutes. I can only conclude that the combination of pressure and exposure that exist in the filter but not in the rest of the fuel system were just enough to slowly block the fuel line. This was especially inconvenient since Bob was stuck in my road, blocking entry and exit until I could get this resolved. It kind of looks like one could pass to the side, but no, piles of snow, trees, and a ditch make that impractical in a passenger car or delivery truck.

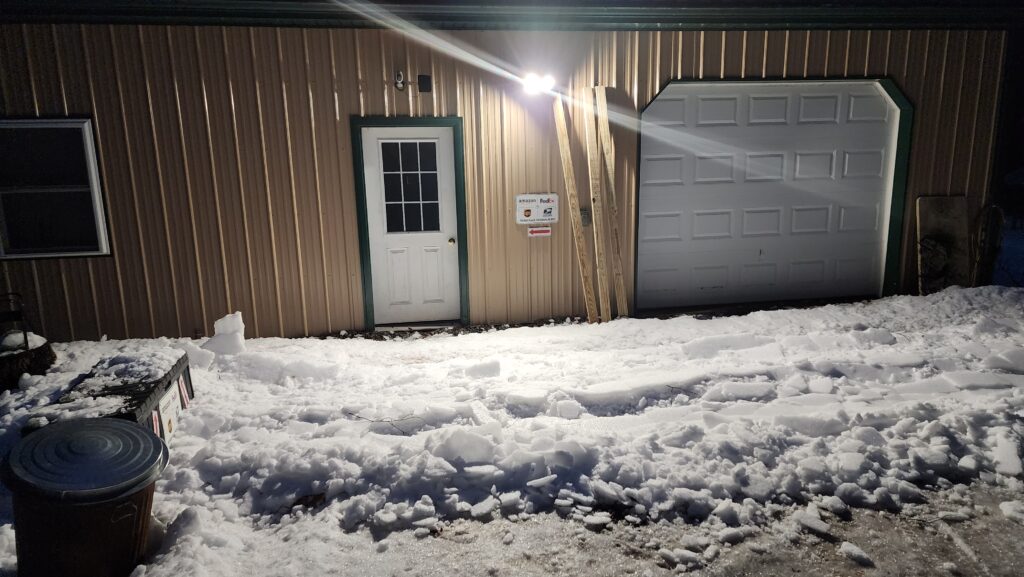
I was pleased to see that the UPS driver did the best he could with delivery of my parcel, though…

Amusingly, the delivery was marked “left at front door”. Well, kinda… 🙂
With much fuss (and fouling my winter gloves with diesel fuel – yuck), I got this corrected, finished the plow job, and have come to really dislike operating diesel machines in winter. I’m sure there is a good reason somewhere why that’s the fuel of choice but it wouldn’t have been my choice. And no, a block heater would not have solved this one – the filter is nowhere near the block, so heating the block won’t help.
Speaking of winter… watch out for falling ice!
Did I ever mention that winter can be harsh out here?
Winter can be harsh out here.
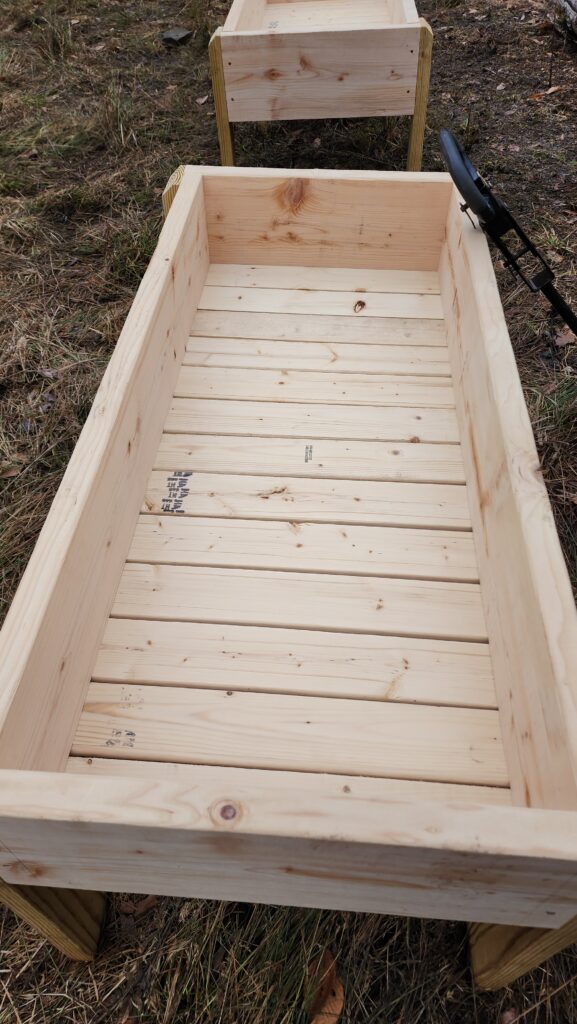
All the more reason to believe in spring! Tired of the soggy soil here making it hard for flowers to grow, I built a couple of standing planters with slotted bottoms for drainage.
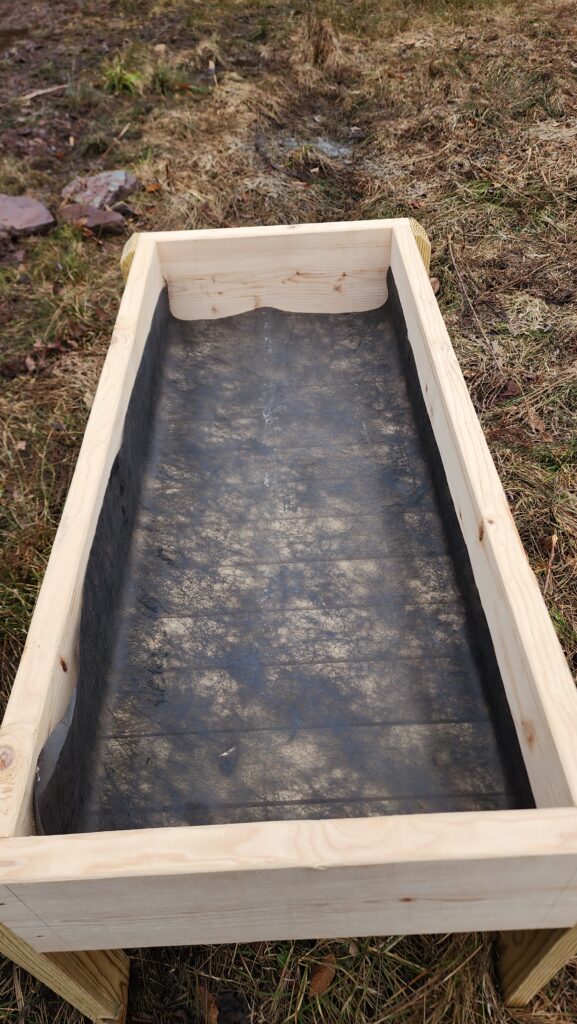
then I filled them with home grown compost and some flower seeds. I also found a use for those tote boxes that bees are transported in (at right).

The bee boxes have drainage holes, too, but they’re useless if the boxes sit on the ground. Hence the 2x4s underneath them, to lift them up just enough so the drain holes can drain.
Speaking of spring, it’s time for new bees! And before I can receive the new bees, I needed to do a few things, including building the new super-insulated hives I was talking about a while ago, as well as rework the hive scales because the hive dimensions and stands had to change as well.
Shown here is a portion of a 4×8 sheet of XPS foam insulation, before it gets cut up and installed into the walls of the new hives. But there’s a problem.
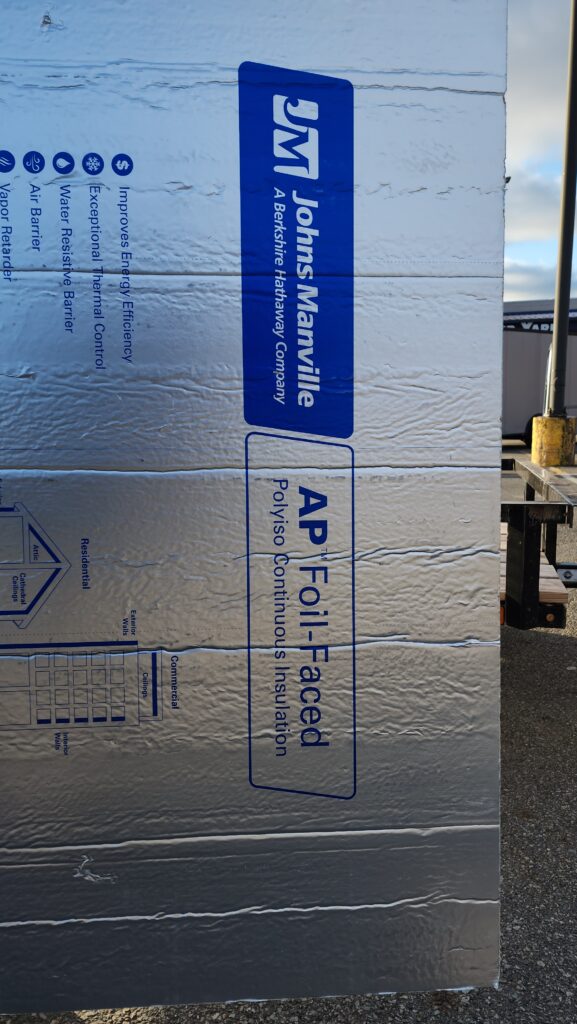
The problem is the foil. On the one hand, the foil increases the insulating power of the stuff, which is good. But it insulates more than just temperature. It insulates radio, too, being metallic. That means it will be even harder for the bluetooth transmitters on the internal hive sensors to get their signal out! A double thickness of this foil-backed insulation, plus all the honey, etc., in the hive, would make it nearly (if not actually) impossible to receive those signals. I’m glad I realized this before building the insulation irretrievably into the hives. I returned these and got some un-faced XPS foam, like I used in last year’s hives, just in time.
The hives themselves are quite heavy, weighing in at just about 140#. This, plus the fact that they are 40″ wide and 20″ deep, means they are quite awkward to move around! Add to that the hinged roof means I can’t just reach in to the 5-sided box to hold it more conveniently without the roof being a problem (there were reasons I didn’t want to remove the roof for transport), and I’ve got a logistics challenge.
Ratchet straps to the rescue! When rigged like this, the roof stays put and more importantly, I can slip my hands behind the straps where the roof overhangs and use the straps as an effective handle to move the hives around. They’re still quite heavy and bulky, but at least this makes it possible for me to move them solo. Not that I particularly enjoyed doing so.
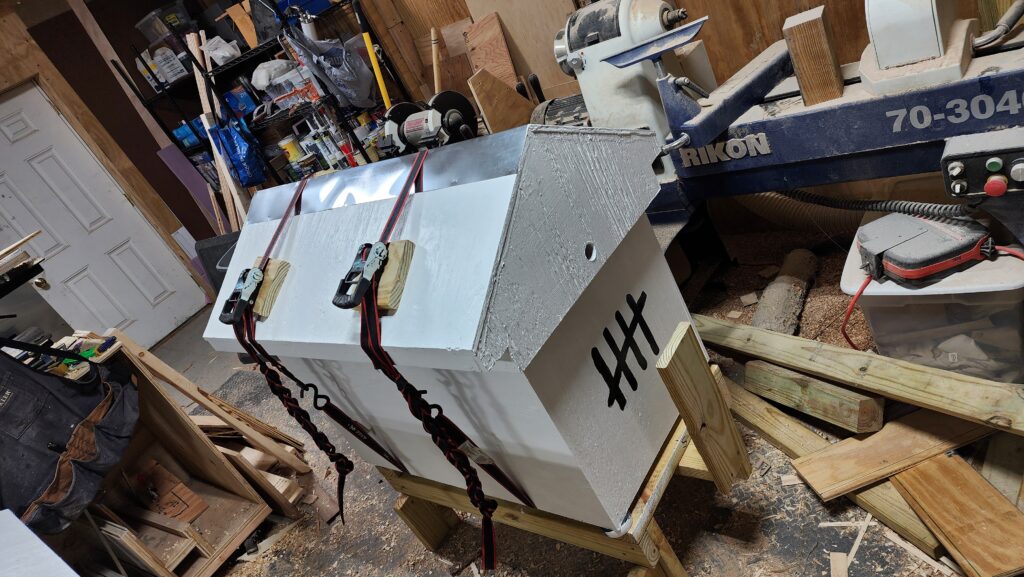
I was fortunate enough to find a helper to assist with getting the hives down to the yard and landing them gently on their stands, something which would have been exceptionally challenging to do solo, even with the straps, given the weight and bulk.
Hey – quick question! what’s a good way to secure four different blocks in place at once, when you don’t actually have access to the back side so you can’t use ordinary clamps? The answer, as it turns out, is the 40# kettle bell I use for scale calibration!
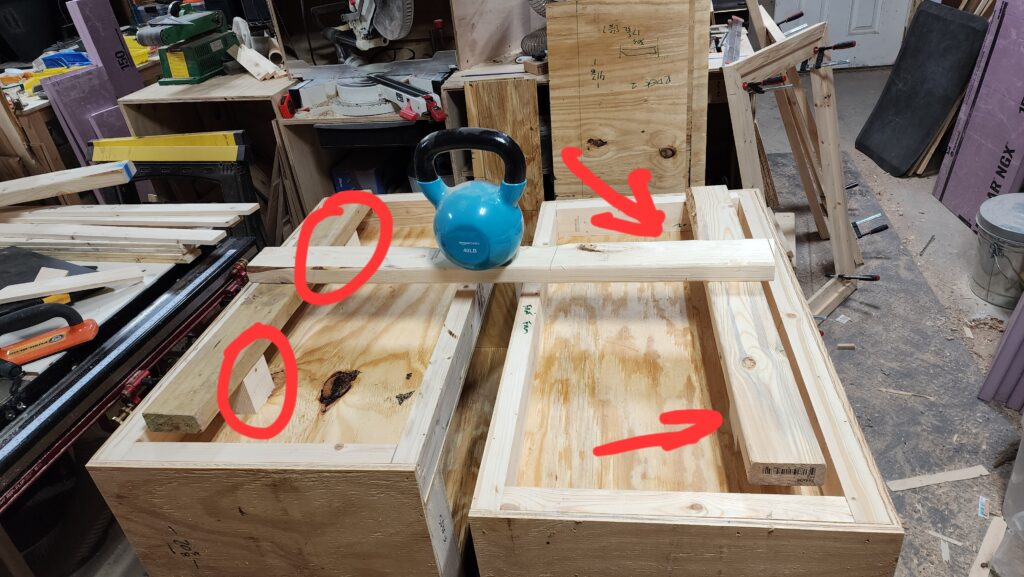
What is this madness, you ask? Shown here are the front faces of the hives, before insulation is installed. The bees don’t like direct contact with the XPS, so I’ve installed wooden blocks that will get drilled after assembly, becoming wooden tunnels through the foam insulation. The bees will never see the foam. But holding the blocks in place while the glue dries required a little ingenuity.
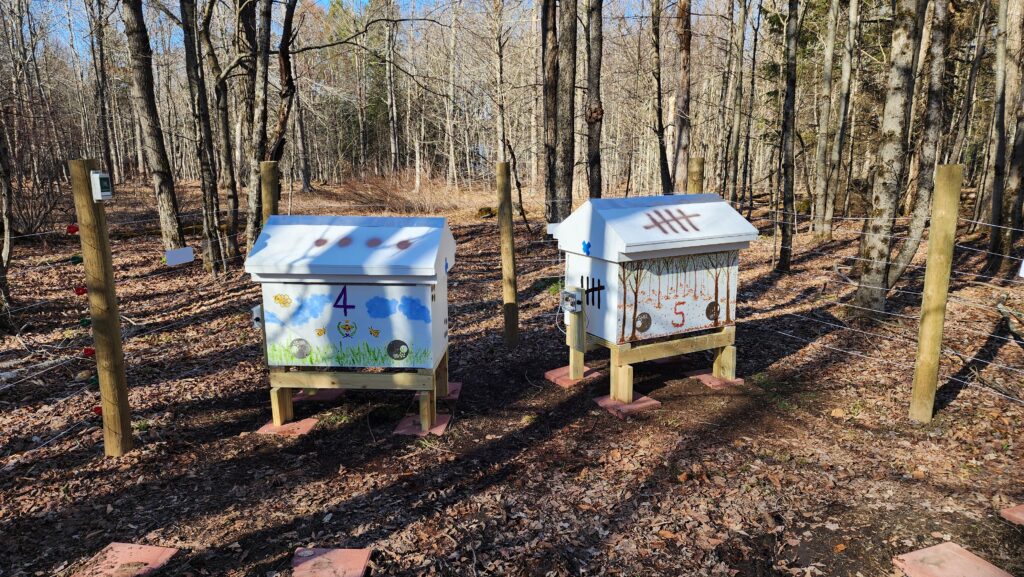
Completed hives, waiting for new residents:
There is one more thing, though. You have probably noticed that these hives do not look much at all like most other hives you may have seen, which resemble a stack of shoeboxes. Those are Langstroth hives and are definitely the most popular in the US, even though they have some serious shortcomings. I use Layens hives, which are much larger, horizontally-oriented hives. The bees seem to like them just fine, but there’s a complication: when buying a starter colony (“nucleus” or “nuc” hive), the bees and their comb (with their larvae) are on Langstroth frames. Those won’t fit in the Layens hives directly.
Last year, I took the easy route, which is to turn the Langs frames sideways and raise the inside height of the hive to accommodate the length. A block is required to make up the horizontal differences. Here’s one of last year’s nuc frames in an adaptor.

This is easy, but increasing the height in the hive to accommodate what is actually the width of the Langs frame means regular Layens frames, which aren’t that long, have significant spaces below them. This results in wild (not on-the-frame) comb being built by the bees, making a bit of a disorderly hive and complicating maintenance and harvest.
Okay, are there any other options? There’s one other. You can actually cut the Langs frames to fit in Layens frames and just use those, with the hive properly dimensioned for Layens frames. Obviously, this must be done with the bees gently brushed off the frames before cutting. And as you might imagine, it makes a bit of a mess. Furthermore, cutting the Langstroth frame results in one big piece that fits across the Layens frame (left), leaving room for the bees to continue the comb below but also creates an off-cut that is an awkward size (right).
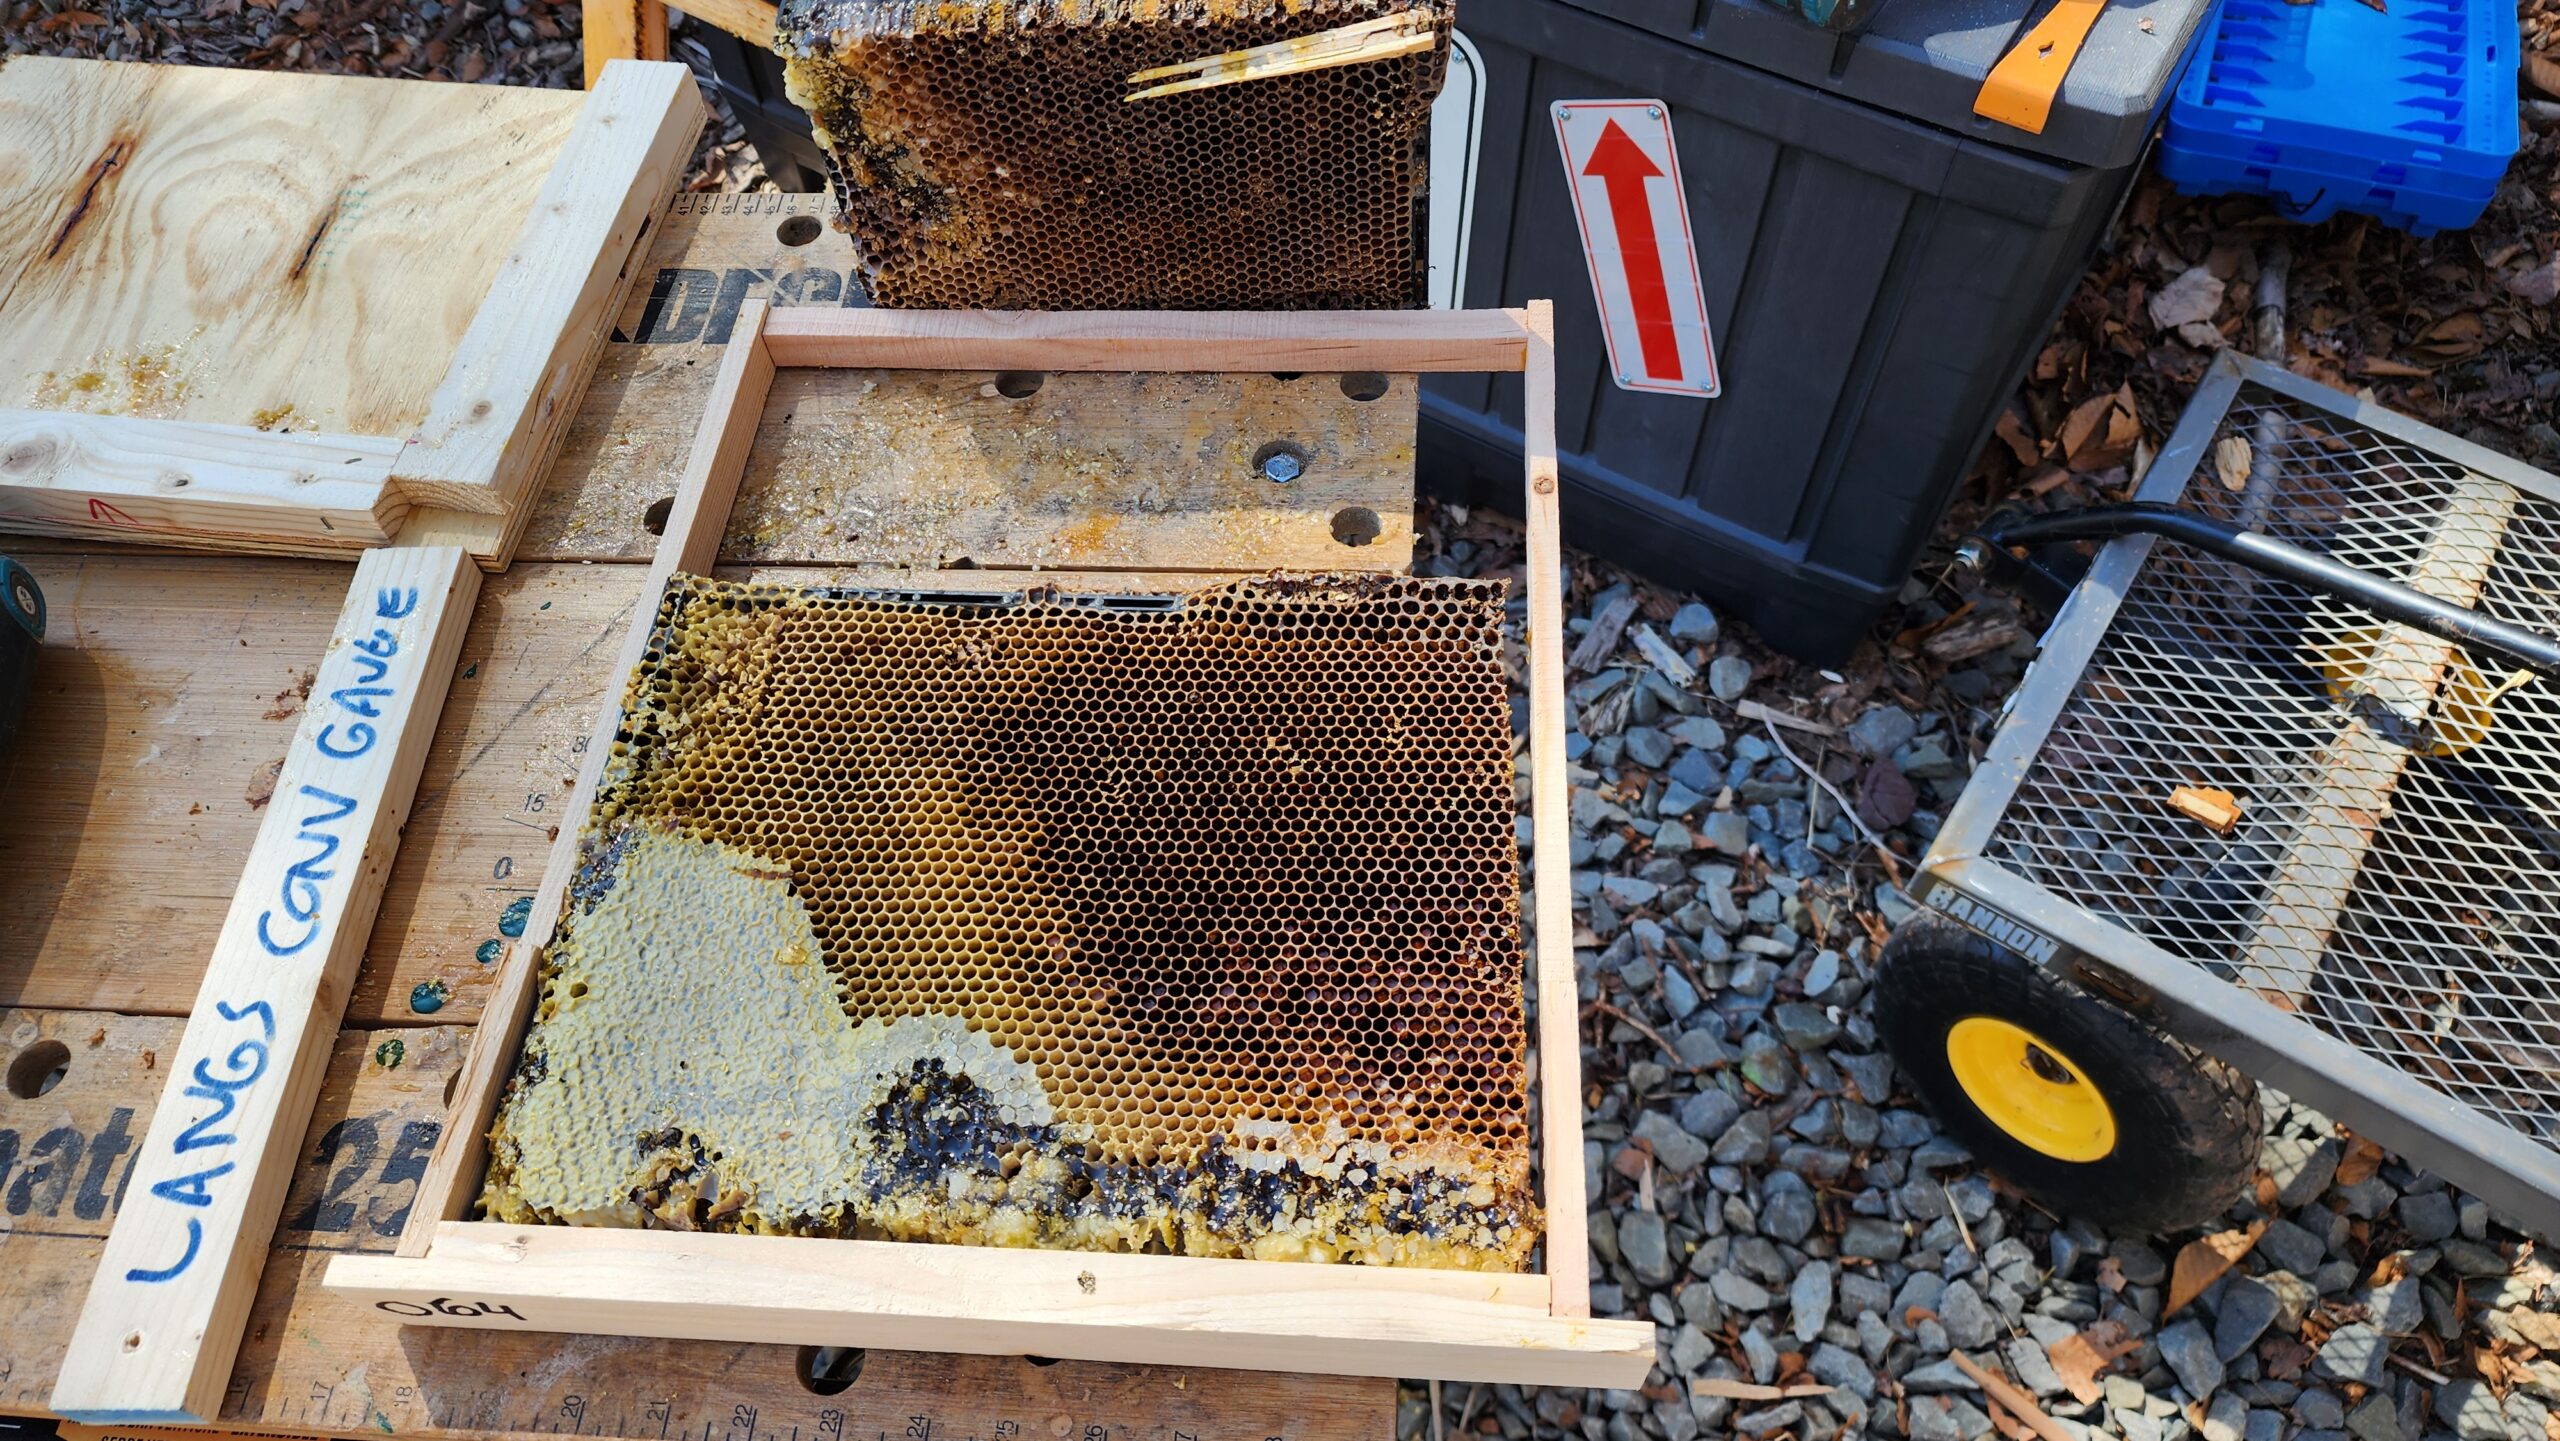
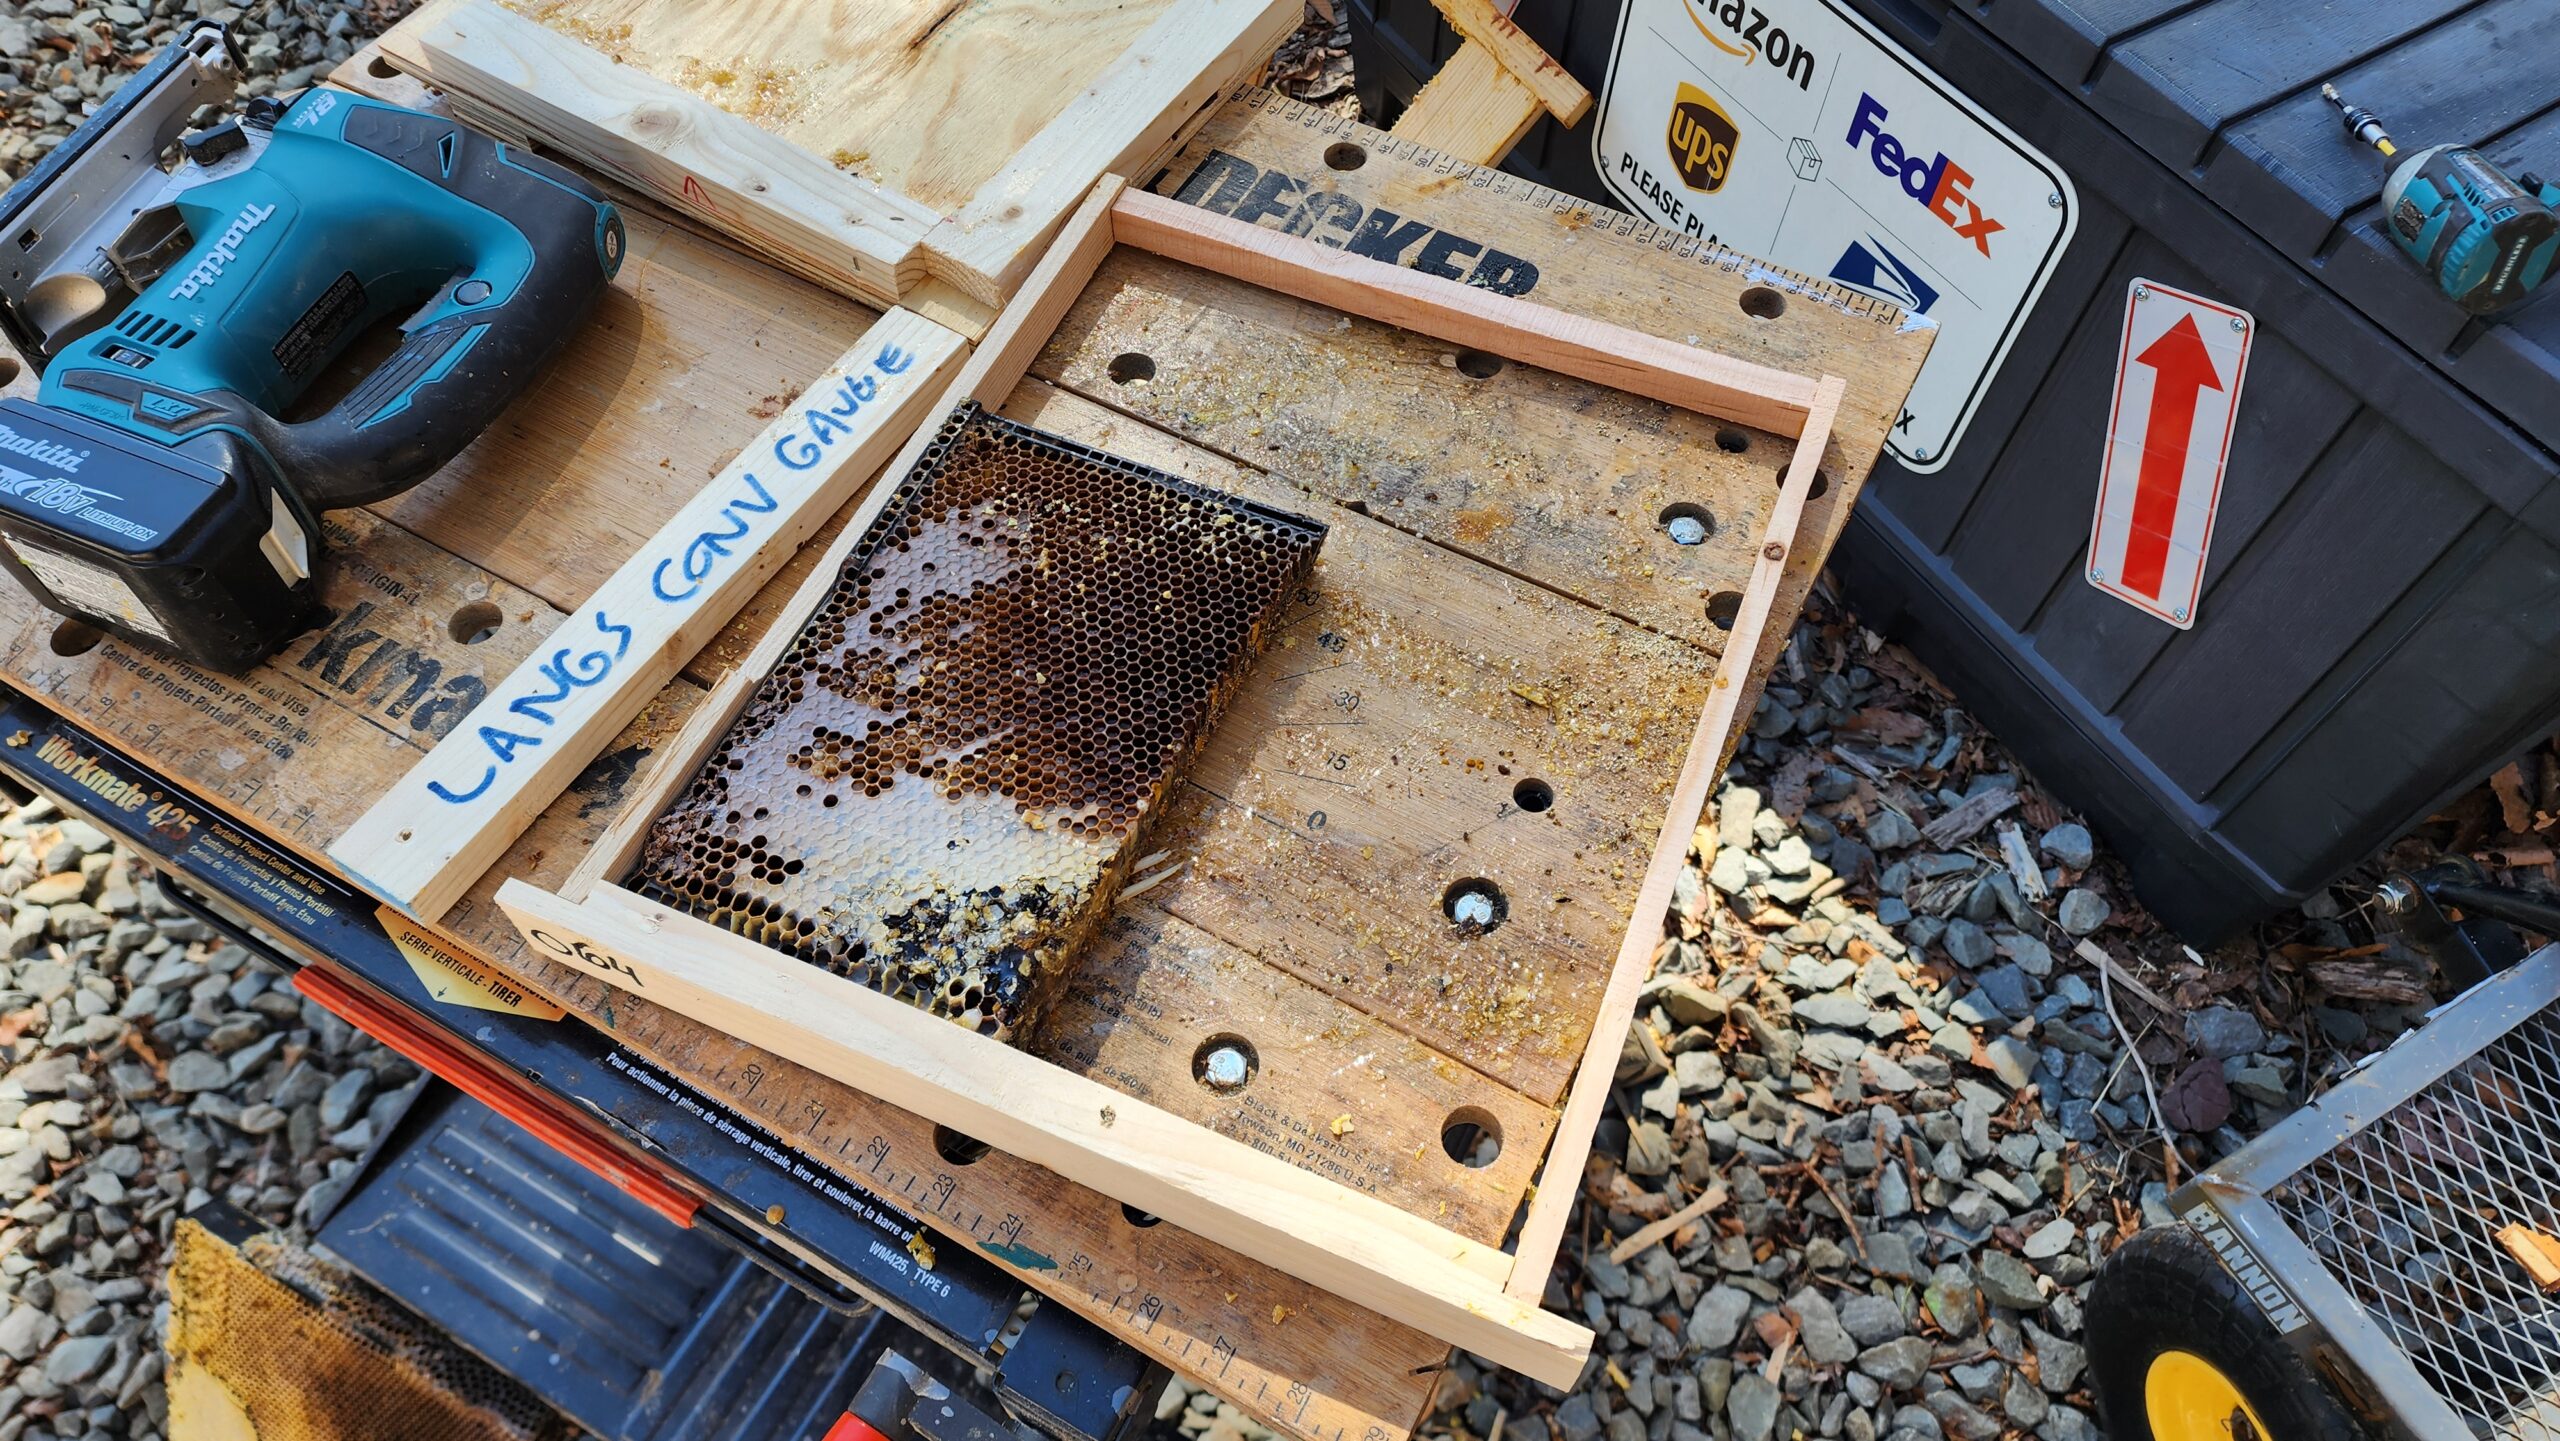
However, two off-cuts fit nicely in the Layens frame this way, so if there’s an even number of Langstroth frames to cut, it works out. Honestly, though, the bees would be perfectly happy to take this as a starter bit of comb and just fill out the rest of the frame from here, too.
The Langstroth fragments are held in place with coarse drywall screws.
The question is, how to make the cut accurately and quickly, since the nucleus colony is disrupted by this process, which happens in the middle of transferring them from the nuc box to the big hive? I came up with this simple jig to make the job easier and accurate.
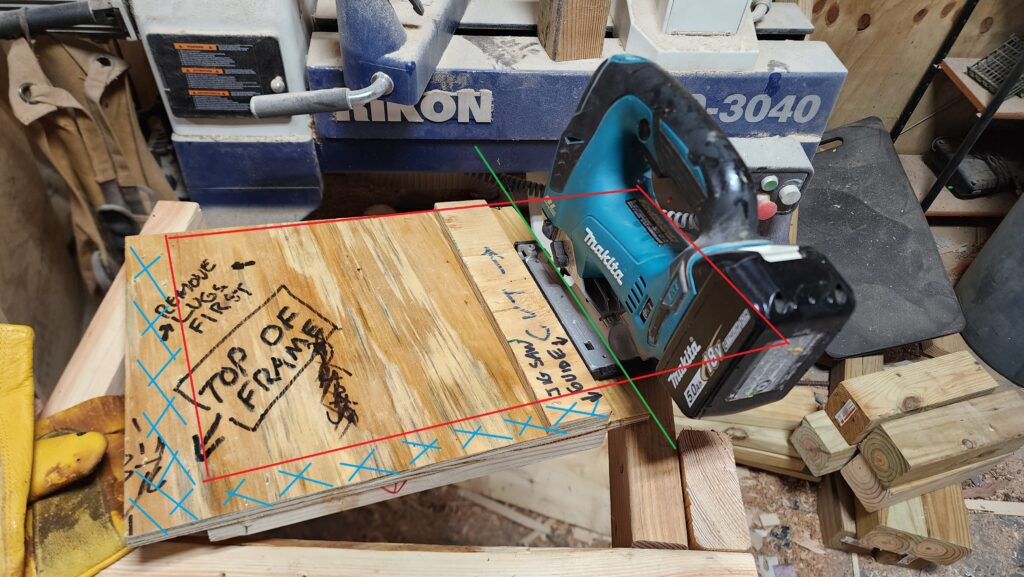
This fixture sits on top of the Langstroth frame (red outline). Cleats fastened to the bottom (blue X) ensure the fixture is in the proper position relative to the frame. Lastly, a strip of plywood stapled to the top guides my battery-powered jig saw to make a perfectly straight cut (green) at just the right place to have the work piece fit perfectly in the Layens hive. The off-cut falls away to the right and is collected and installed in a second empty Layens frame as a “shoulder”, shown in the prior photo. This photo here is staged in a messy corner of my workshop without an actual frame in place, but you get the idea.
This worked splendidly on installation day.
This fixture ensures accurate cuts and has a second benefit as well: it prevents the jig saw from riding directly on the comb, protecting the comb from unintentional damage.
Speaking of bees and frames (and increasing shop safety), I needed to build some empty frames for this transfer. The one part of the frames that are a little tricky to make are the sides, which have a wider top and narrow further down, to allow bees to pass easily between frames. Last year, I just ran the blank partially across the router table, stopping at the appropriate depth of cut. This got the job done but tore out the wood badly when done in a single pass (multiple passes would have been unstable) and meant removing the piece while it was engaged with the high speed cutter, which can be dangerous, too. I had a fresh idea this year that turned out to be a winner.
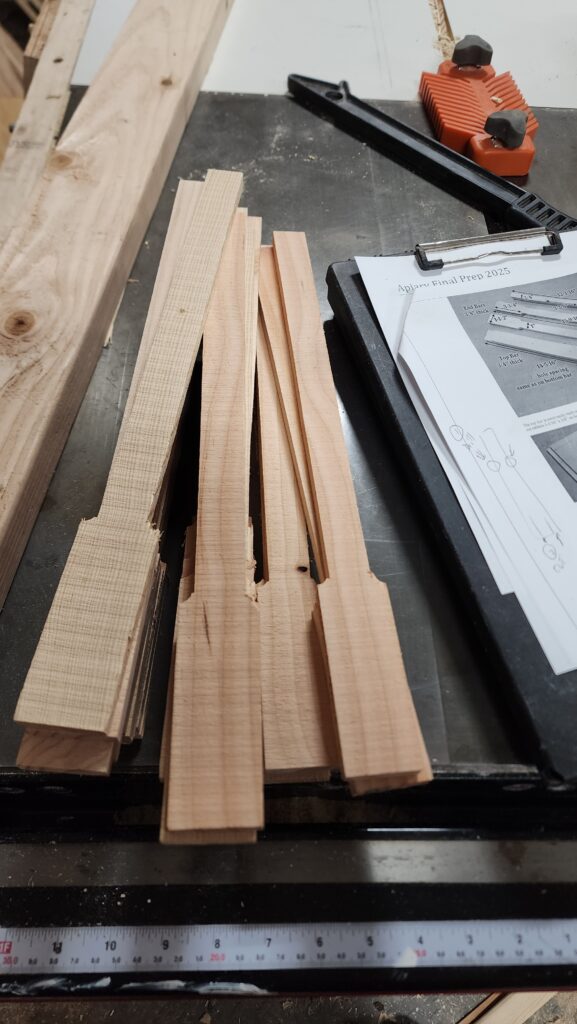
First, drill holes in the blank at the transition. Using the drill press with a fence and a stop, this was a no-brainer to perform multiple times accurately. A Forstner bit is beefy enough to drill an accurate half hole without wandering. Just hold the blank into the corner and pull down the drill to make the cut. Flip and do it again. Presto, two holes perfectly located. As shown below, the work piece is slightly out of place to highlight the difference between the work piece and the spacer parts, made of similar wood.

Next, drive the work piece into the band saw, until the blade exits at the holes just drilled. This is much safer because the work piece is removed when the blade is not actually engaged with the work piece.
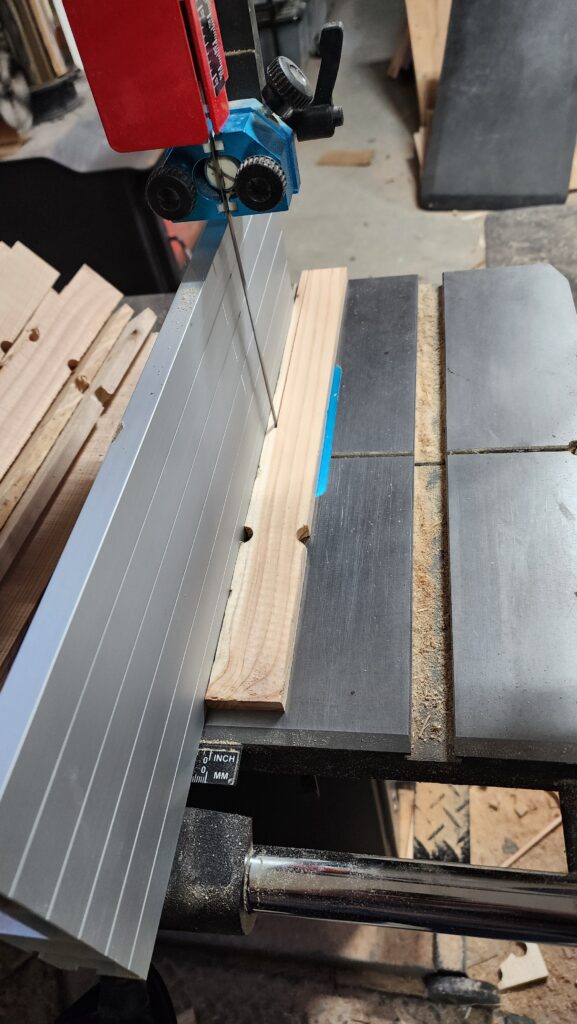
This was very quick, accurate, safe (hands are several inches away from the blade at all times), and easy.
The finish on the bandsaw cut is a bit rough, but that doesn’t matter at all. These parts do not need to be furniture grade smooth and pretty. The rough cuts are perfectly fine for this.
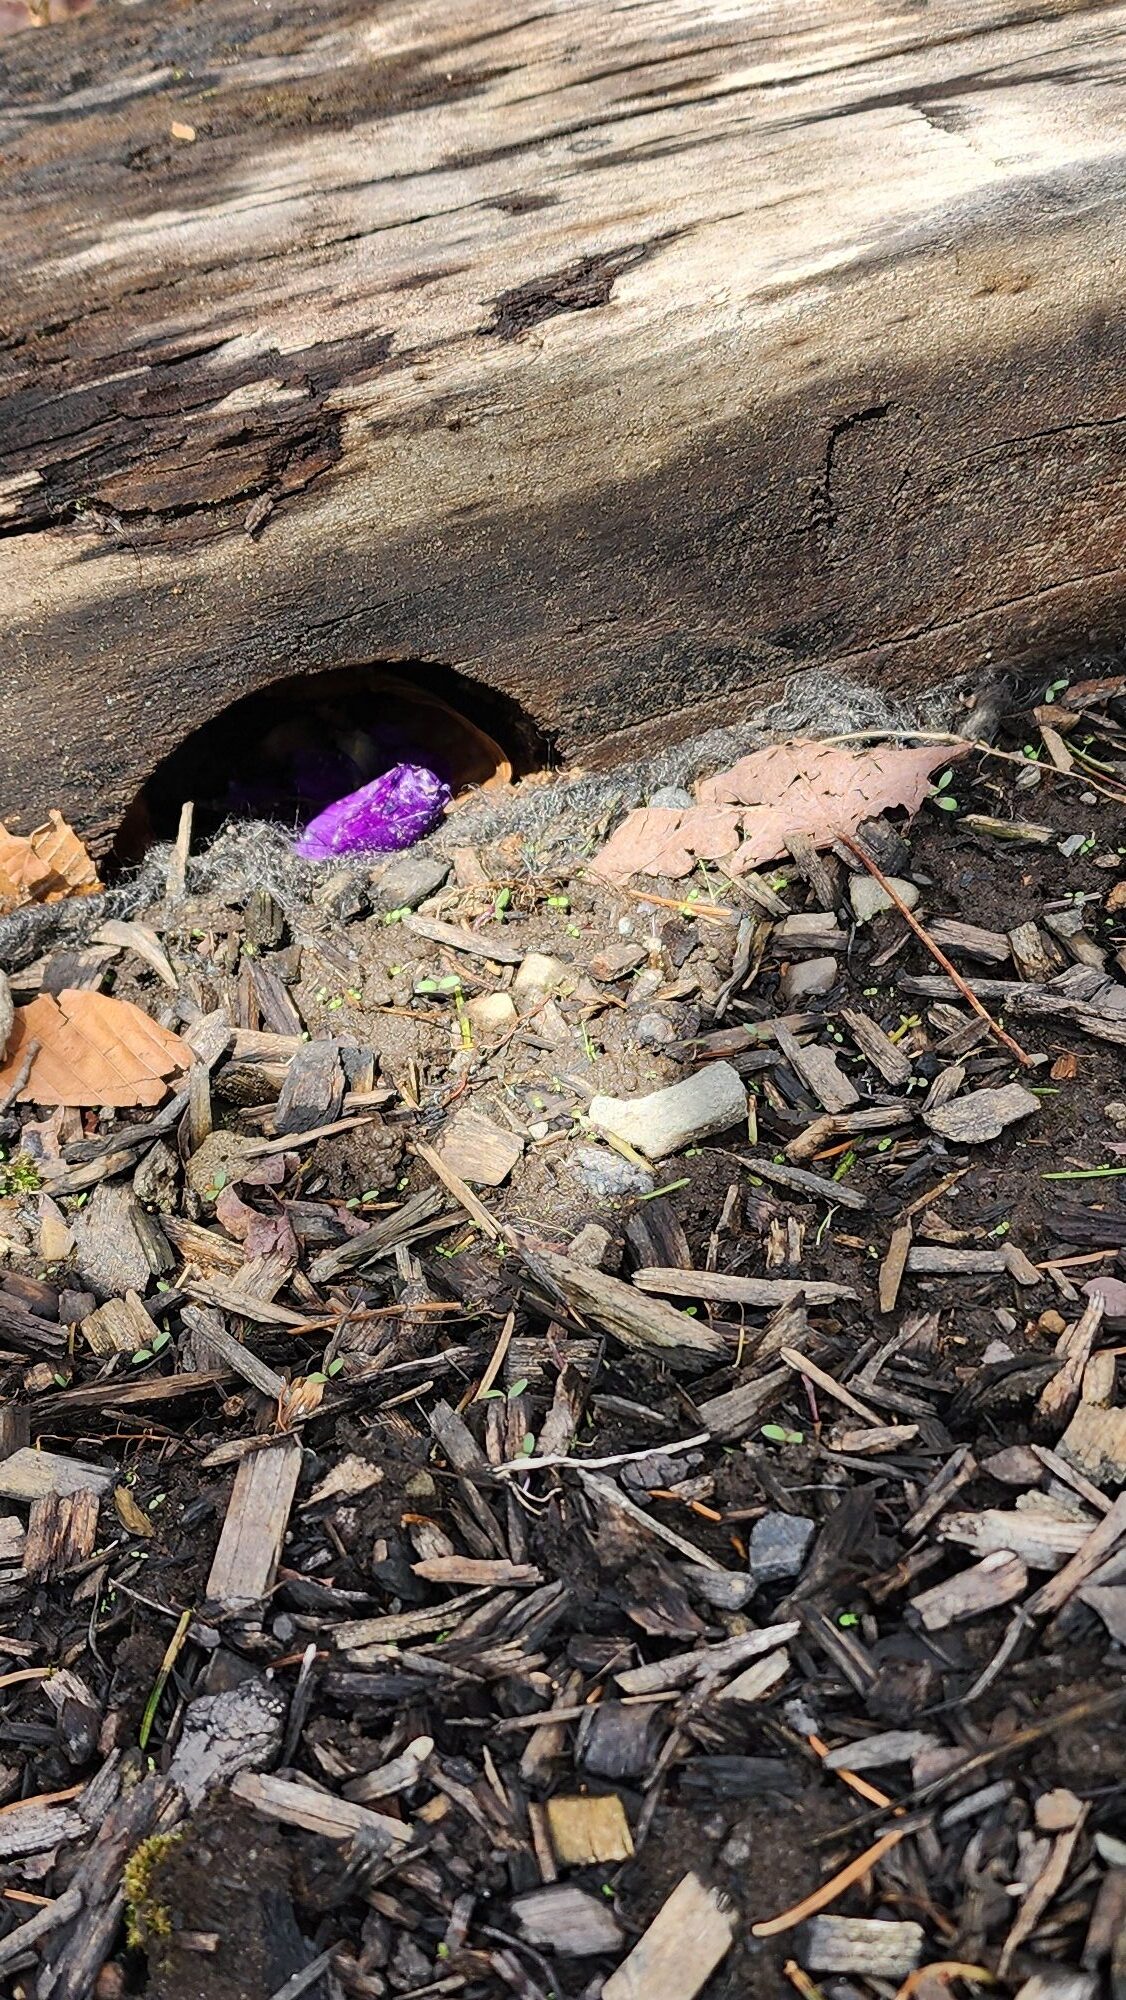
A spring mystery… who do you think bit off these crocus flowers and stashed them in this hollow? There was more than just this purple bloom in the hole, but that’s all that shows easily in this photo.
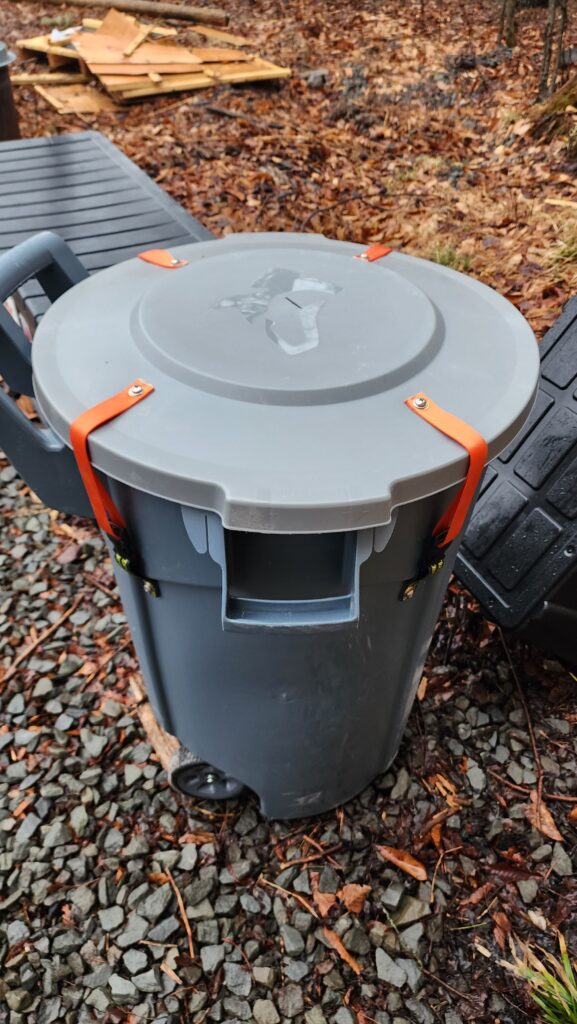
Speaking of creatures taking things… I had a creature, probably a local black bear, tear into my trash. Usually, my trash lives safely indoors, but obviously it must be set out for collection on collection day, which provides the local fauna a chance at it before the truck comes.
This was my response, a hard shell for the trash (not just a plastic bag), and some tie-downs to keep the lid on against all creatures who do not have opposable thumbs.
And lastly, a few random photos to make you wonder where I’ve been and what I’ve been up to. Click for detail.