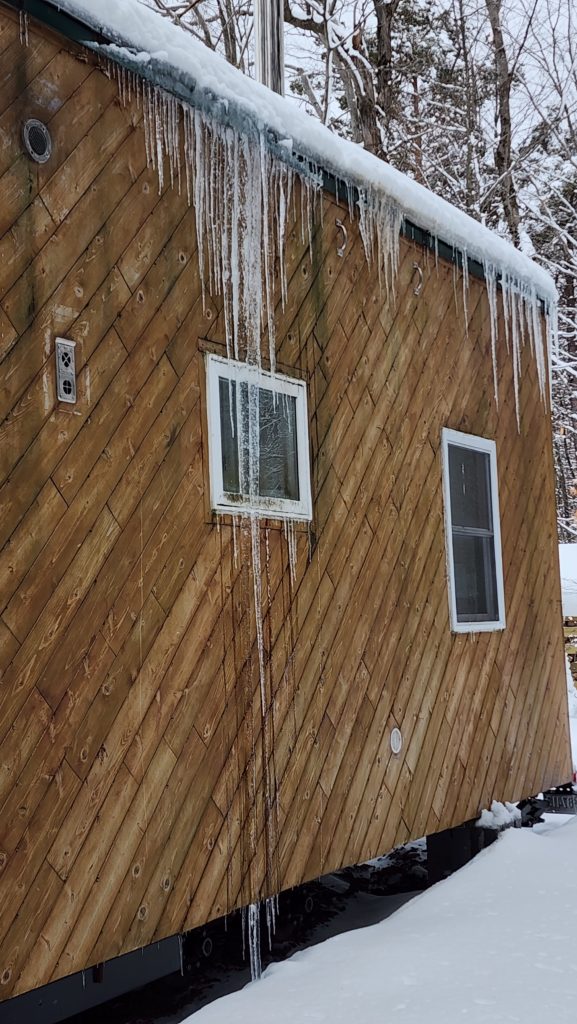
You might guess from this post’s title, along with the general notion that flues shouldn’t fly once they’re installed, that things didn’t end well with that snow-glacier on the workshop roof. If you guessed that, you’d be right. While I was not able to actually inspect the system except from ground level (it’s not safe ladder weather and I don’t have a drone — the one used to run the pilot line for the installation job doesn’t belong to me and doesn’t live nearby), I could make some deductions based on what I could see from the ground.
First, consider this.
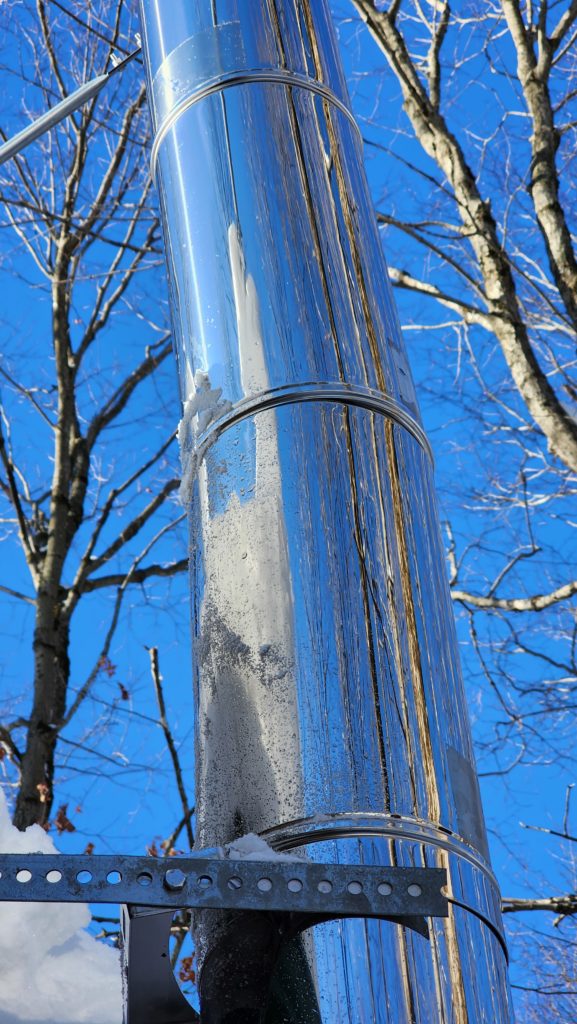
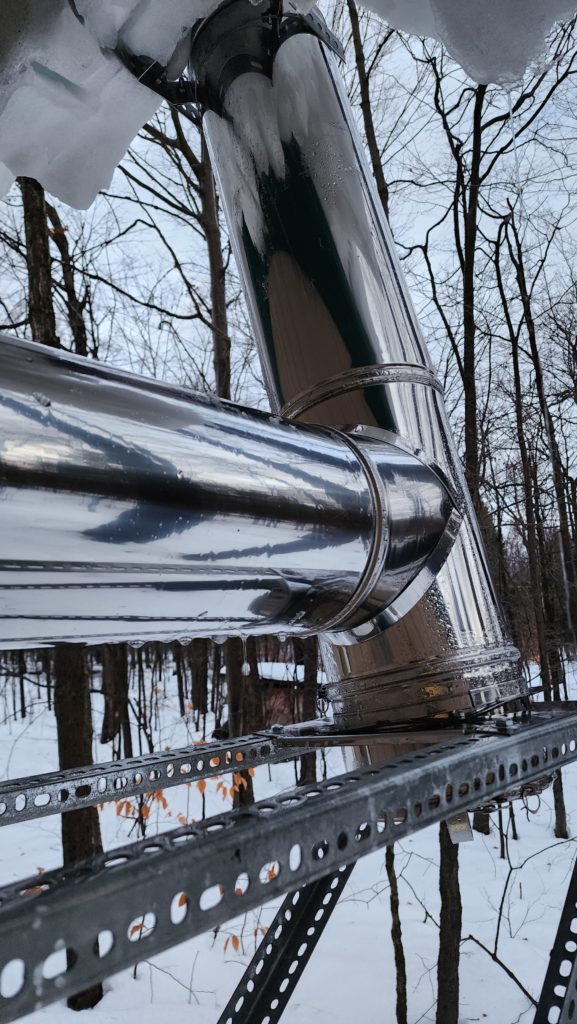
The fact that the flue is tipped toward the roof, even as the snow impinges at the tension straps (with holes) tells me that something is pulling on the top of the flue, since it’s not possible for the bottom part to be pushed out because the tension straps are still in place. What could be pulling? Remember the flue stay that we installed a few weeks ago? It has long tubular arms that anchor on the roof and extend to a collar way up on the flue. One of those arms is visible here. The flat part you can see with the bolts, though, is supposed to be attached to the collar. The collar isn’t visible here. The arm shown has become disconnected. The other one is probably still attached. Let’s take a closer look up.
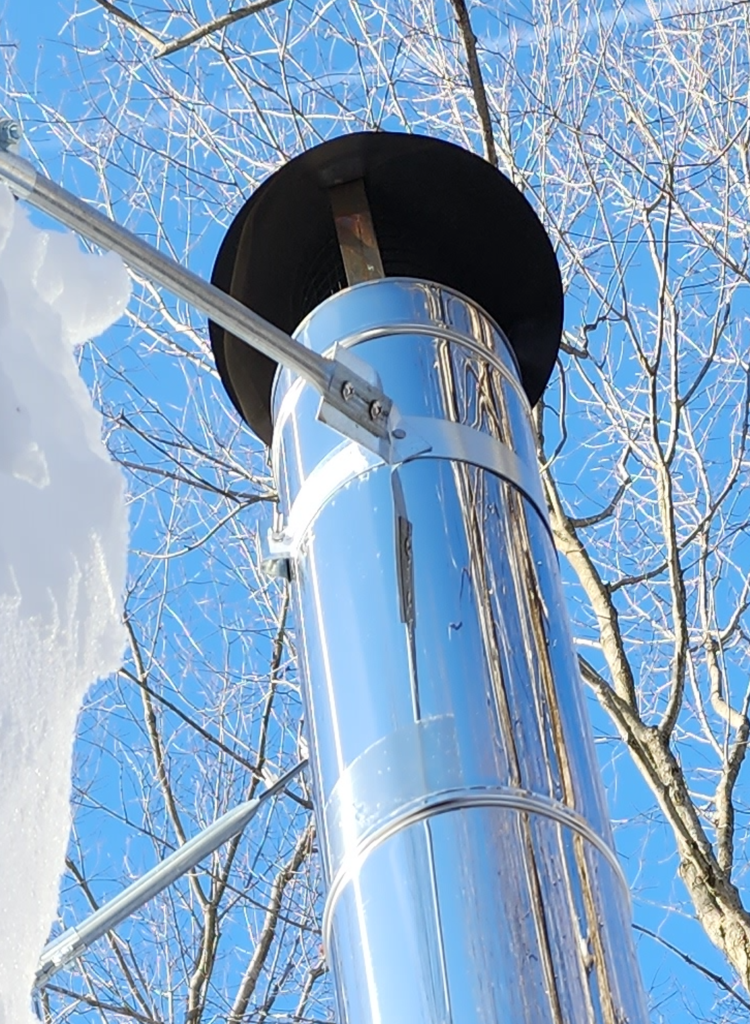
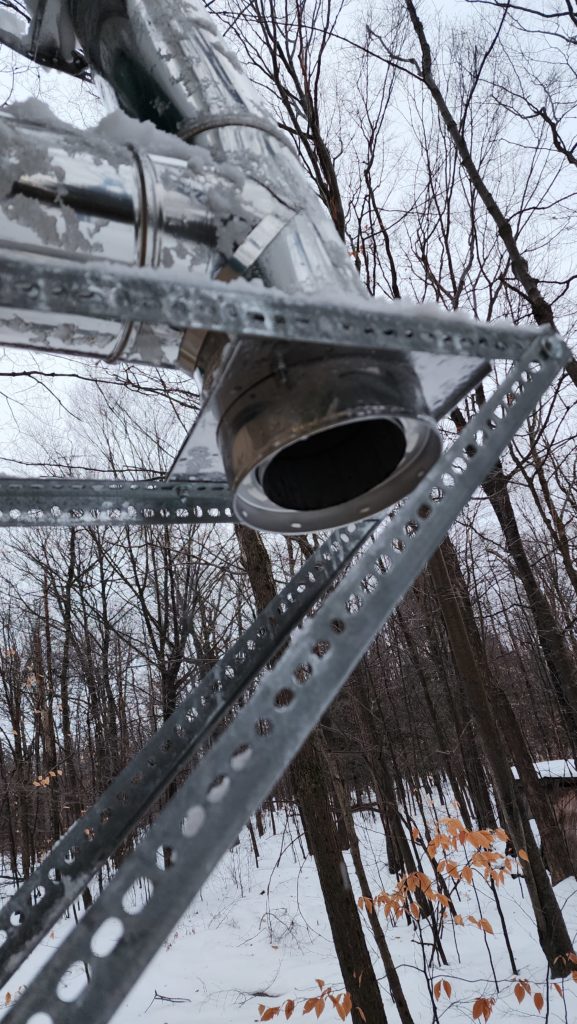
What I see here is one arm (foreground) is still attached to the collar, but is twisted. The other arm is a bit lower than it should be. Since the collar is still attached, that means the arm has come free and is just resting on the side of the flue. Not so good.
A few days later, the system looked more like this.
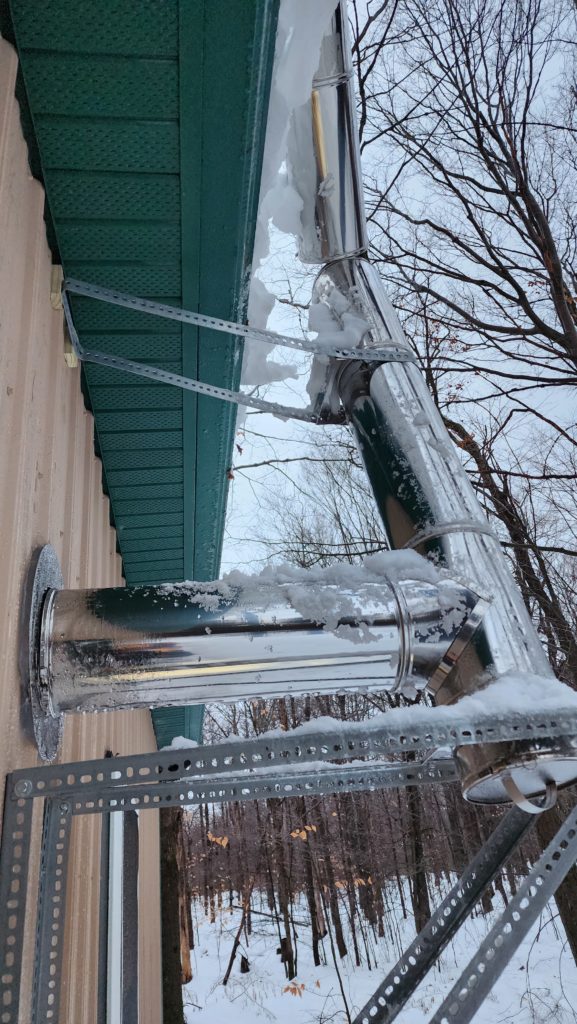
The tension straps have been pushed down a bit, and the slight angle at the joint near the gutter has come completely undone and is just barely hanging on. The whole stack has also tipped to the side (away from the viewer) a bit, but is kept from further motion by the tension straps.
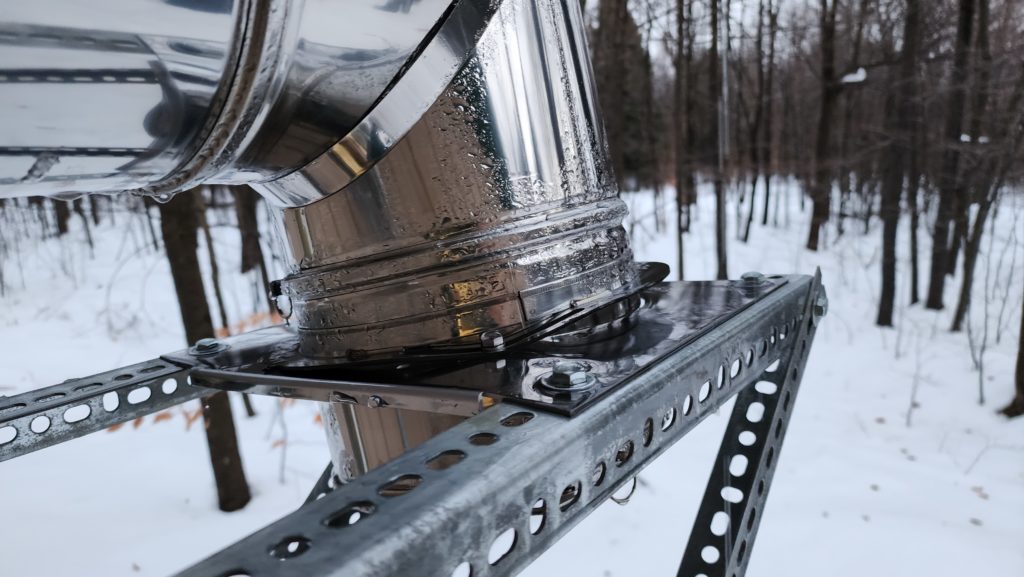
You can also see the anchor plate has been torn up a bit. I’m not sure if it is actually permanently damaged or simply bent such that it can be bent back. I’ll have to inspect it further. This next photo suggests it’s simply bent and that the attachment points are intact.
What I think happened is the super heavy, dense snow actually caught the stay arms and bent them as the snow-glacier front moved down the roof. The arm, bending at its newly created elbow, effectively shortening it, pulled the top of the flue stack off at the nearest weak point – that twist-lock joint at the gutter. The first arm just broke off at the collar under the stress. The second held on (perhaps because the first was no longer buttressing it) but that meant when the arm bent, it took the flue top with it. That was this.
At this point, I want to rescue the top of the flue stack but it’s too snowy to deploy the ladder stage again (I’d have to rebuild it anyhow, since I reclaimed its studs for that wall work, thinking I had no further use for the stage) and the super long extension ladder is buried beneath a few tons of snow, even if it could be positioned in such a way to access this safely — something of which I am not at all certain.
So I wait. But before I just leave it alone, I want to be sure the now uncovered flue pipe doesn’t conduct rain water into the stove. This bit of prevention is easy. Just open the cleanout so it doesn’t fill with water.
Then this happened.
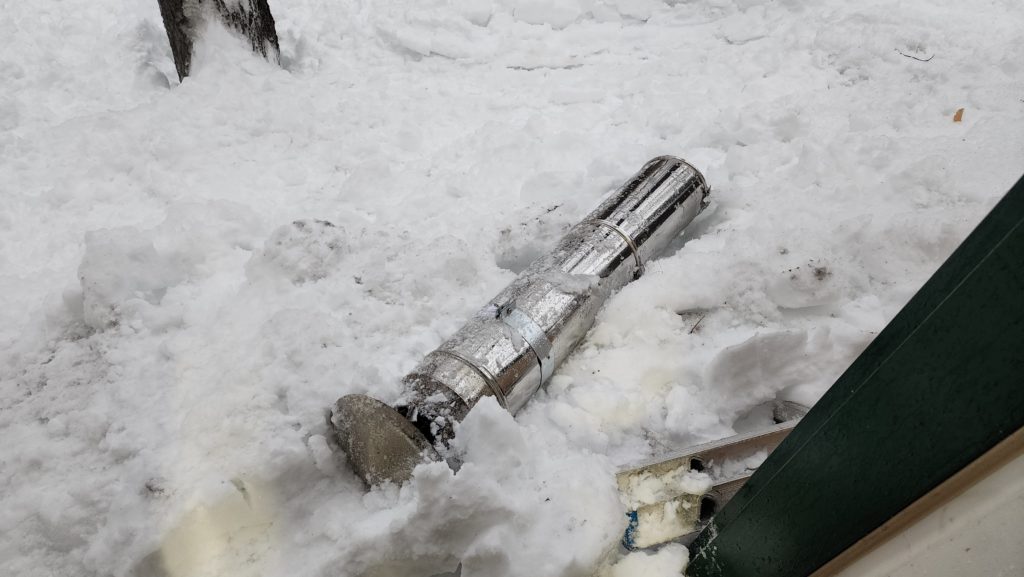
The rest of the snow-glacier finally slid off the roof and brought the flue top with it. Amazingly, the entire assembly doesn’t seem to have been damaged at all, the body being nicely cradled by the snow and the sharp edge of the cap slicing in where it fell such that it hardly bent at all. Nice. This stainless steel double-wall class-A flue is made from expensive parts. This part here would be at least $300 to replace.
Well, at least I don’t have to rescue the flue top from the roof…
… but I also don’t get to use the wood stove in the workshop until this is resolved.
On the one hand, I am really pleased that the angle-iron base supports and tension strap system I designed and installed did so well against the massive snow. It was the lightweight tubular arms topside that ultimately made the system fail. I didn’t design or build those, I just bought them. Still, the system failed and therefore must be made resistant to this kind of insult, which surely will recur.
The obvious answer is to have put the flue exit on a gable end rather than an eave, so there wouldn’t be any snow glaciers at all. But that’s not where I wanted to put the stove because that wouldn’t be the best spot for heating or using the room. That remains my Plan C, since now I have a 10″ hole in the side of the building where the flue penetrates now and I like where the stove is located, so I’m invested. If Plan B fails, though, Plan C it will be.
What’s Plan B? This is Plan B. Everything below the flue (red) is the same support that’s in place now and that did so well. The tension straps and arms are gone and some new features are in place. I would have laughed at this system as being over-built, even by my standards, a week ago, but having seen what I’ve seen, now I think it’s fit-for-purpose and not overbuilt at all. Let me tell you how I expect it to work.
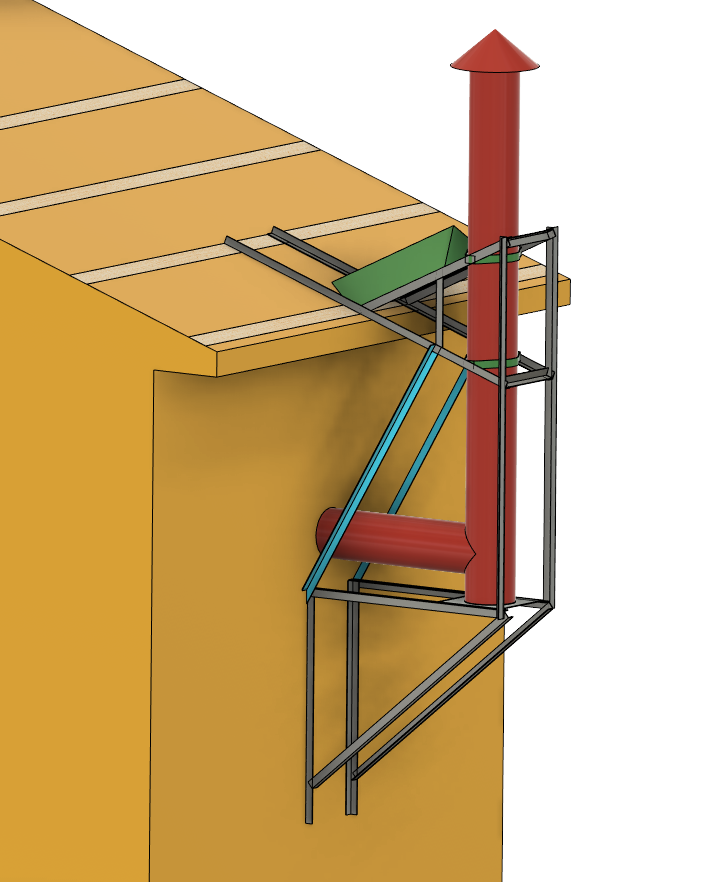
First, the triangular support at the bottom is the same as it ever was. Its primary job is to support the weight of the flue. That weight is translated into shear forces downward and some pressure against the building walls. The wall members span a pair of 2×4 horizontal girts which themselves span about 5ft between structural 5×6 posts behind them. That, plus the tensile strength of the building skin (resisting inward bursting) provide a significant amount of resistance to the forces presented.
The runners on the roof have multiple roles. First, they cover the function of the prior tension straps in that they provide a retaining force to keep the flue from being pushed away from the building. They also transmit all other lateral forces from the upper collars (green) back to the roof purlins (2x4s below the surface, highlighted here for reference), which are well equipped to resist them.
The sideways A-frames extend the roof runners so the upper part of the flue gets some of that lateral force mitigation as well. The cross bar in the A is meant to act in compression, greatly reducing the chance of the angle iron bending under the force of impinging snow.
The green roof-like structure (“snow break”) is a key new feature here. Note that it is angled upward as well as it mostly exists over air, not over the roof. Here’s what I envision happening as snow comes down the roof. The snow will ride up the snow break, which will lift it away from its neighbors, which will continue to flow to the sides of the structure and eventually fall to the ground. The snow that rides up the break has nothing keeping it there except the stickiness to the snow behind it. This snow has already been split over the peak of the break and now wants to fall aside, essentially impacting the cut edge of the snow spilling over the roof to either side, adding more weight and encouraging it to break free and fall to the ground. Most importantly, all of this happens to each side of the flue and support structure. No snow should actually push against the flue at all.
Now, if the snow is super sticky, it may ride up the snow break quite a bit, but I believe the fact that the break is uphill and the rest of the snow front will be spilling over the edge of the roof, that whatever rides up the break won’t ride up much and won’t make it all the way to the face of the flue before other factors cause it to fall away. Will this actually be the case? How deep can heavy snow accumulate on the roof before it slides? How effective will the break be at breaking the snow glacier front? No idea. I mean, I sure think it’ll get the job done, but we won’t know until we do.
It does appear that the twist-lock feature of these flue sections is actually designed to snap cleanly without damage when under excessive loads, so worst case is sometimes the top comes off and needs to be restored. If that’s how it goes, I can live with that, assuming the rest of the stack doesn’t get damaged in the process. And if the whole thing fails catastrophically, I just hope it doesn’t take parts of the roof with it! The side of the workshop I could patch if I had to, but the roof requires difficult access and good weather.
I still need to figure out exactly how to build the snow break feature and attach it to the runners — and of course, actually install all this at some opportune moment. I do plan to have the parts cut and whatever I can pre-assembled so it’s ready to go as soon as that opportune moment presents itself. It’s not uncommon to have an isolated day or two of nice-ish weather during the winter now and then. Fortune favors the prepared.
Do you know where my heat is? It’s in two places: the wood stove between the galley and the BeDiLiA, and the propane heater over the fridge, just outside the T.H.R.O.N.E. Room. Know where the heat isn’t? It isn’t behind the bathtub and specifically it isn’t behind the bathtub at floor level. You might rightly wonder why the floor behind the bathtub matters at all and that would be a perfectly legitimate question. The perfectly legitimate answer is that along the baseboard of that wall run a couple of PEX pipes, one each for hot and cold water distribution, to the tub and the wash sink.
I learned recently that if the main house is 50F (at chest level, where the thermostat is) and the outside temp is near zero, it turns out that exact baseboard can, in fact, get below freezing. The walls of the house are decently insulated (R20-ish) and the ceiling is quite good (R-39 or so), but the floor is R15, which isn’t bad, but neither is it “good” and given that heat rises, unless something is circulating the air, that space behind the tub, on the floor, is gonna get and stay cold. Really? Really. Exhibit A: frost on a bolt!
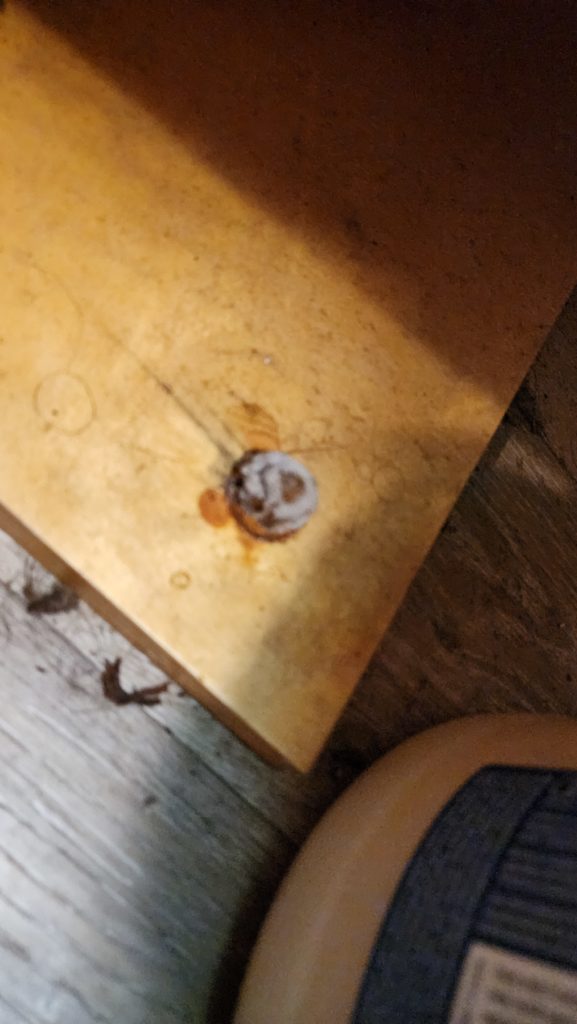
The fact that there’s moisture on the bolt is also interesting — I figured that out last year but haven’t done anything about it yet: the cold wall condenses moisture in the air, which runs down the floor, capillary action wicks it under this board and up the threads of the bolt, expressing water on the surface of the board and rusting the bolt. And, in this case, freezing!
There was no meaningful way to directly heat behind the tub, but I could just circulate the cool-but-not-freezing floor air from the rest of the house into that general area. This was my plan for dealing with the humidity back there, too, though I meant to do this with an installed and unobtrusive solution some time in the future. Well, the future is now. This fan (black), in conjunction with warming up the house to 70+ (the floor air is still cold, but perhaps not as cold), was all it took to thaw out those pipes on the back wall. I’m not talking about the drain pipes (white) you can see. I’m talking about 1/2″ blue and red PEX pipes on the far wall, behind the tub, which you can’t.
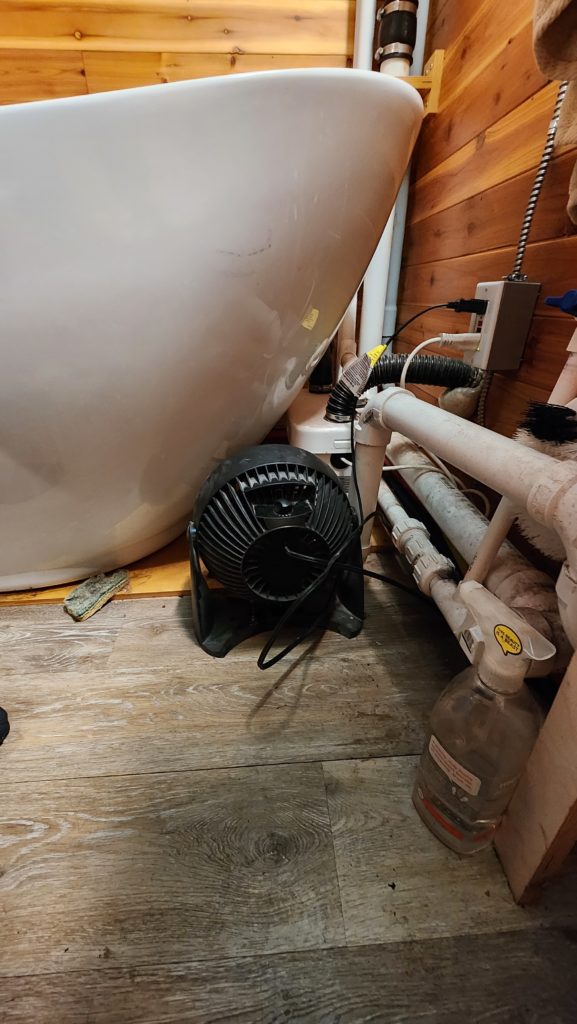
I have it in mind to install one of those square “computer” fans back there, but it’s never been an issue serious enough to warrant priority. And getting it back there and secured isn’t something that sounds at all like fun. There’s a chance that I could reach from the other end of the tub, which isn’t as crowded with other stuff, though it’s not exactly “wide open space”, either.
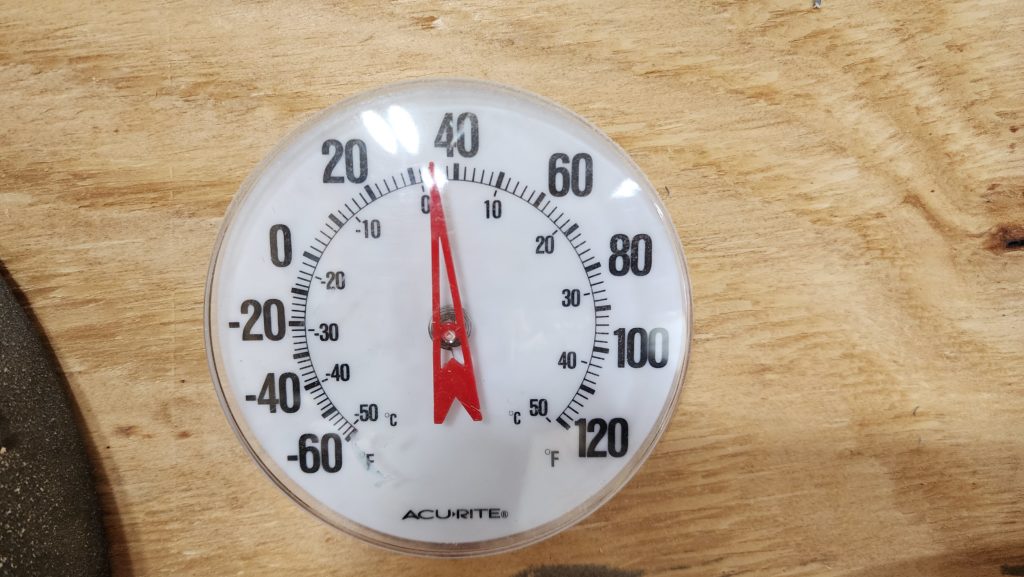
Speaking of cold, though, let’s talk about insulation. Now that the workshop is 100% insulated, it is holding heat MUCH better than before. Well over a week since there was any heat applied, with freezing and sub-freezing temps prevalent, the inside temperature of the workshop remained above freezing! It was above 40 for many days, actually. This bodes very well for comfort in the deepest parts of winter (fast approaching!) assuming my flue scaffold & snow break plan work out.
Nature is giving me a break: today it was nearly 50 and tomorrow will be a little warmer – I’m going to try to find a safe way to get a ladder to approach the flue area (a non-trivial task made more difficult by a snowy slope) and attempt to install this structure.
Meanwhile… I had this idea that my continuous chocolate tempering machine, recently retrieved from hiatus, would find its home in the Tidy Room where I could once again practice confectionary arts with some efficiency. Further consideration revealed that this activity really wants to be performed in a legit kitchen, even a small kitchen, and that the Tidy Room just isn’t suitable. The machine is just too big for the house, though, no matter how hard I tried to find a home for it. Then I discovered there is, in fact, a continuous tempering machine that is “table” sized. I mean, the thing still weighs nearly 100# when full, but that’s less than half what the floor-standing machine weighs and it uses only half as much energy, too, which is a very important consideration here in solar-power land.
So I bought it (happy birthday to me) and installed it under the stairs.
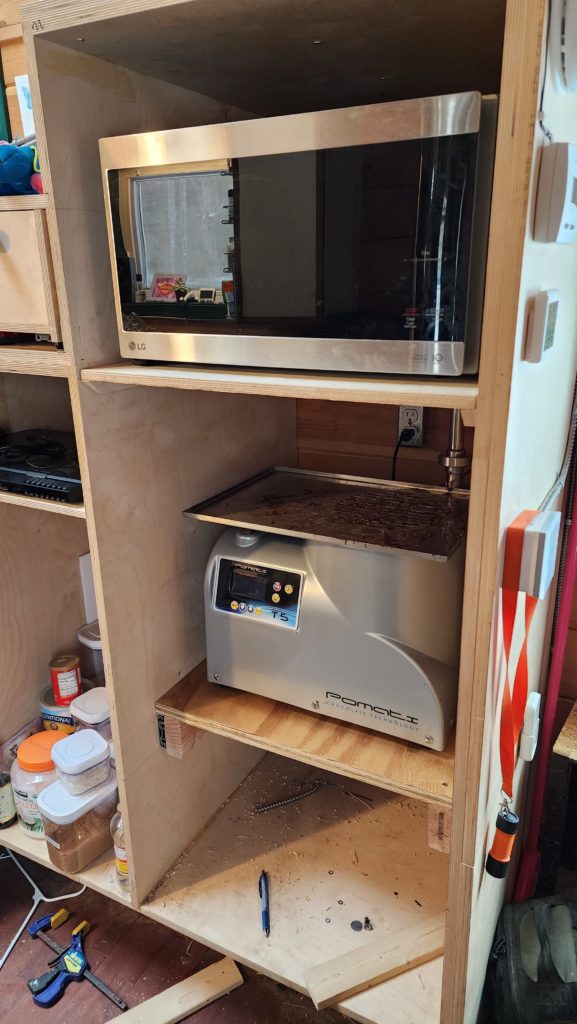
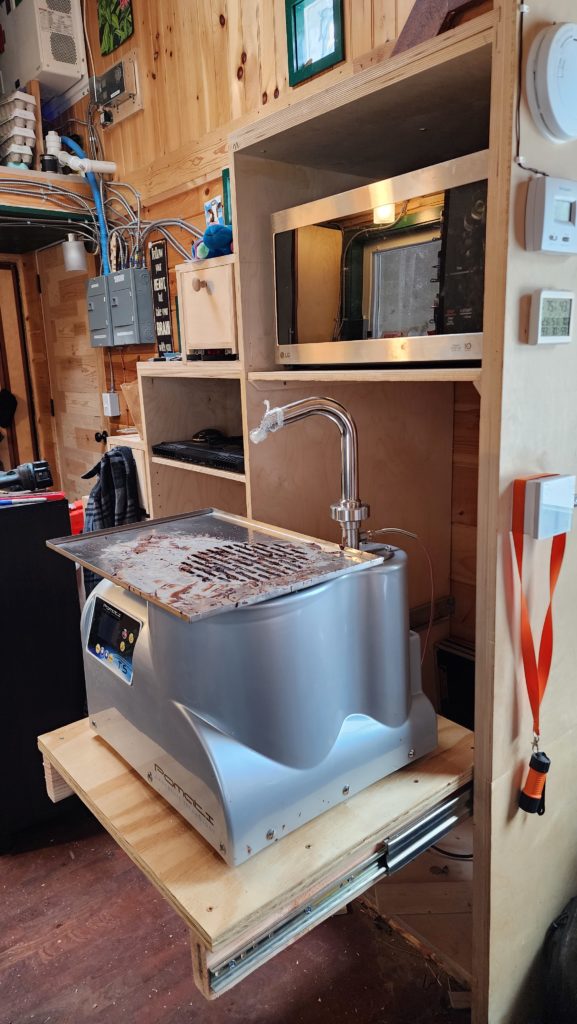
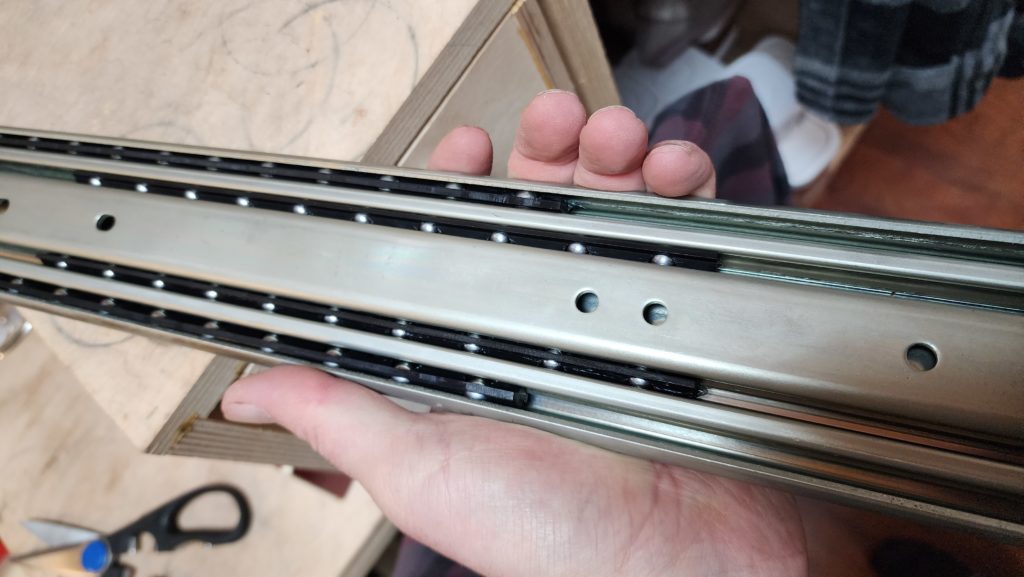
I needed some super-duty drawer slides to hold this monster up at full extension. I found a set rated for 500#. Overkill, perhaps, but I’m not going to risk dropping my $6,000 machine because I saved $20 by purchasing under-rated drawer slides!
Seriously, these things are kind of massive. Unfortunately, they also do not come apart, so there’s no mounting one part to the drawer and the other to the cabinet and then mating them later. This meant I had to either make templates, measure carefully, or wing it carefully. I chose option #3 🙂 It came out decently – the shelf is not quite centered in the space, but it’s good enough and that’s good enough. I didn’t have any of that dress cabinet plywood available, so ordinary stuff got used instead. Also good enough. Maybe I’ll pretty this up later, maybe not. For now, I just needed a home for this machine and that’s what I have. It can side out for use then slide back for storage or if I need to pass by, since it would be blocking much of the corridor.
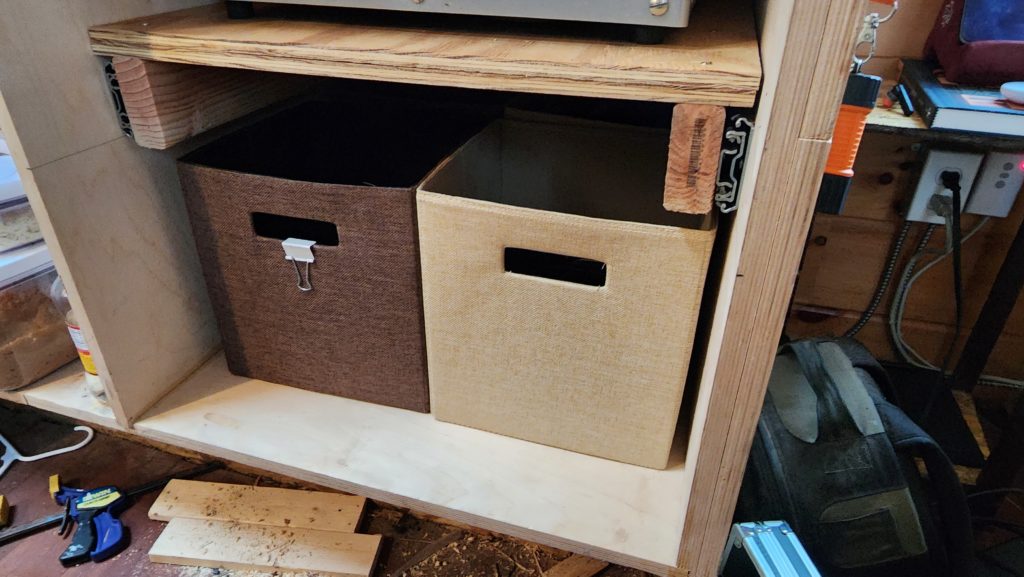
There was even a little room below where I could stash four (2×2) of my storage cubes that I use for clothing. That doesn’t quite make up for all the storage area now claimed by the machine, but it’s a good start.
I have a plan for the rest. Coming soon. Flue first.
For my first trick with the new machine, I went for another try at hollow spherical cordials. This time, they came out very well! They’re so shiny you can actually see the three lengths of strip lights reflected in them!
