I’ve been living in the HomeBox for just over two weeks now. Friends ask me “what’s it like?” and “how’s it going?” and more interestingly, “what’s been the biggest challenge?” The answers might surprise you.
One of biggest challenges is also one of the biggest benefits: everything moves slower out here. It moves slower for a few reasons. First, people are just more relaxed and generally less hurried than they are in cities and suburbs. Small towns aren’t known for their fast-paced lifestyle. That is ok with me – I like it like this. But part of what makes a small, rural town so appealing is also what makes things take longer: if I need something from a hardware store, the closest that has any kind of meaningful stock is 12 miles away. The closest decently stocked big box home center is more like 40 minutes to get there and the closest Big One with All The Things is a solid 50 minute drive. I used to rent those load-n-go store trucks whenever I had bulky things to get home (and it was all of three miles to get home) but that ceases to be time effective when it’s an hour’s round trip. To use a rental truck, that’s driving down in my car, coming back with the truck, returning the truck after unloading, and then driving home in my car – an extra two hours of driving and a lot of truck (low mileage) fuel. A few weeks ago I bought a small cargo trailer for about $1000 and while I don’t know that I’ve saved $1000 yet in truck rental fees and fuel, I have definitely saved quite a lot of my time and convenience already, and that counts for a lot. What do you need when you live in the country that you don’t need when you live in town? A pickup truck or a trailer (or both), and probably a chainsaw (have that, too).
The second challenge has nothing to do with living in the country but everything to do with living in a tiny house: indoor humidity! My little house is nice and tight and well insulated and that’s good, except any cooking I do releases water vapor. Any breathing I do, releases water vapor. That water vapor has nowhere to go so it condenses on the cold windows and rains back into the house. Seriously, I found mold growing around nearly all my windows after just two weeks of this!
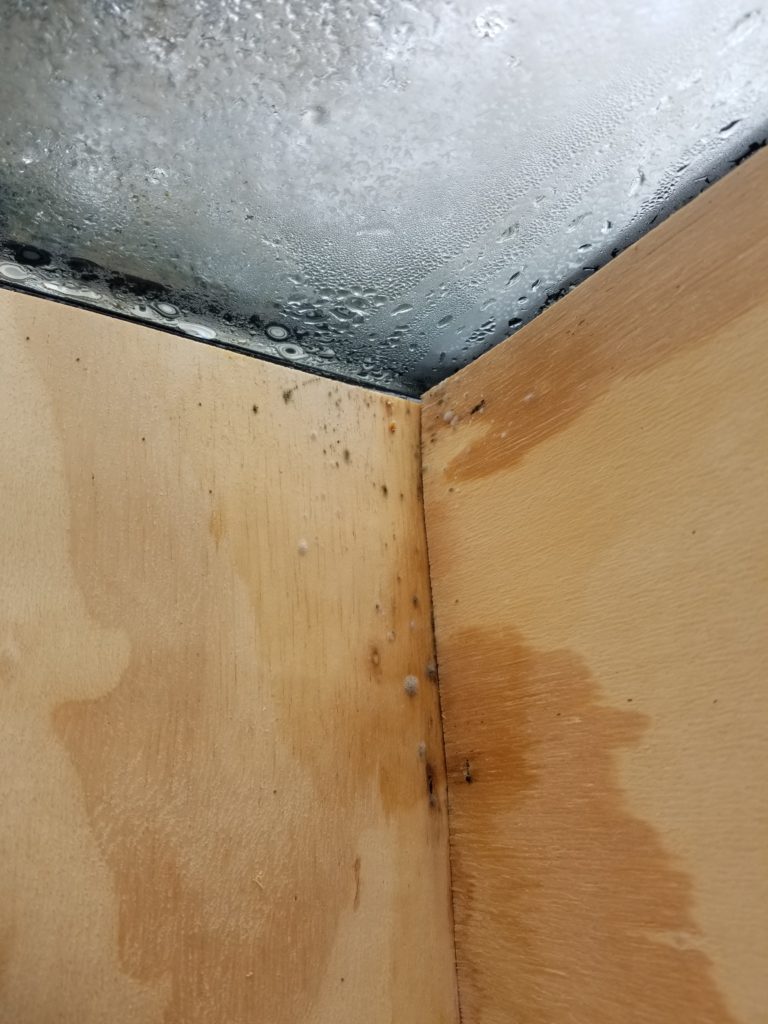
No bueno! Actually, this wasn’t the worst of it, just the first I found. Later, I found some far more developed colonies. I went after them all with a bleach solution. And hey, my respiratory system was a lot happier after that, too, go figure!
I have purchased (arrived today, actually) a “heat recovery ventilator” to address this problem. An HRV is a blower and a heat exchanger configured such that as it exhausts warm, moist air from the house, it captures most of the air’s heat and stores it internally. Then it reverses direction, drawing in presumably dry outside air, passing it through the heat exchanger to warm it up as it comes into the house. The idea here is that you’re not wasting heating energy by exhausting hot air to the environment. Instead, you change out your air but get to keep most of your heat. Likewise, if the indoors is cooler than outdoors, the core of the HRV will get cooled by the exhaust air and will therefore have a chilling effect on the air drawn in. I found a small unit that has very low energy consumption and is said to be super quiet. I plan to install it very soon, as the only other way to keep the humidity below the condensation point was to keep a high window open a crack, which works, but also wastes energy and introduces a cool draft.
The third challenge has nothing to do with anything except that I’m on a newly-named road. It turns out that it takes time for new road names to propagate through the world’s databases, even in these modern, connected times. A full 5 weeks have elapsed since the road was officially named but it still does not exist in the USPS database so when I go to reference the address online, it fails validation and I’m told “no such address” even though there certainly is: I’m right here. This, as you might imagine, is rather inconvenient. I have a PO Box that can receive mail and packages, but sometimes I need to provide a physical address and while I can refer to the PO by iits physical address and get packages delivered there, I don’t actually live there so it doesn’t work when I need to specify where I actually live. I don’t know how long this will take (I’ve asked the guy at the county maps department and he hasn’t gotten back to me yet).
The fourth challenge wasn’t supposed to be a challenge! I had a cellular internet service that turns out not to be what I thought it was – 100G/mo only applied to using the service on a phone, not a hotspot, for which only 20G was allowed. Also, the data speed was pretty poor. Uploads were absolutely terrible to the point where things were aborting because they took too long. I did some shopping and found another carrier who had what I needed… except the hardware was out of stock for another month, maybe two. Sigh. I ordered it anyway and will suffer through using my phone’s hotspot feature (which after 15G will slow to a crawl, but at least keep going, in theory, unlike the other service which abruptly stopped working) until then. I also pre-ordered StarLink, which is satellite-based, but they don’t have coverage at my latitude yet. In theory, they will by mid next year. I’ll have to see how this second cellular provider works out. If it’s really good, I’ll just keep it and cancel the StarLink. If it, too, is poopy out here, I’ll muddle through and go with SL when it’s ready. Why not just get wired service? It’s 350+ ft from here to the main road and I’m concerned that tree-related service interruptions will be both common and low-priority for repair, given the remoteness. Nevermind I don’t have an address I can give them, either! Lastly, local power outages would disrupt my connectivity if it was wired. If it was via satellite, I’d be good to go no matter what. I like that idea. We’ll see how it all plays out.
So besides being challenged, what have I been up to out here? Well, I’ve continued building out the W.O.G., especially focused on the office partition. It’s slow going because (a) everything is slower here (see above) and (b) I’m back at my day job, so I have day job things to do during the day, as well as attending to life. Also, winter is just about here, even though it’s only mid November. Temps are routinely in the 30s and 40s and in two weeks I’ve gotten three dustings of snow already. This means working in the W.O.G. is cold and because the days are short, I have to work by artificial light and all I’ve got is a couple of worklights. They do okay, but with all the darkness around, it’s hard to stay motivated.
Part of the W.O.G. Build out features installing that upper course of framing, on top of the wall modules already built. It’s a tight fit – on purpose, so it stays put – but that also means getting it there requires some effort. And by “some effort” I mean I had to get creative to persuade things into place. Sometimes that meant using a quick clamp to pull parts together (left). Other times, I had to use more aggressive means, such as this pull-bar. The bar is ostensibly for doing flooring, to cinch up courses together. It’s got a down-facing lip (to the right) that grabs the thing to be pulled and an up-facing flat (left) that one strikes with a hammer to persuade the thing grabbed by the lip to go where one wants it.


Also for the office, heat! Well, first the gas line, then heat. The gas line terminates at a fitting outside, where the propane tanks and regulator will be placed. Shortly after installing this, it began to rain. I didn’t want water getting into my gas line, and I didn’t have a cap, so I improvised with a plastic grocery bag and made a shower bonnet!


Why did I route the gas line on the floor rather than just across the wood parts already present? Answer: the wood parts are tempting places to drill/nail/etc. These are things one does not want to happen to a gas line. So I routed the gas line away from every tempting place to do carpentry. It is deep in the 12″ thick wall and no amount of later machinations such as mounting shelves or cabinets or other built-ins will come anywhere near it. All the structural parts are well in front of the gas line. The one place that’s not quite true is where the gas comes out to the tap in the room (not shown). In that case, the line rides the edge of a post, at the back of the wall (against the outer shell of the building), where it will still be safe from any thoughts of attaching things.
I really like this yellow corrugated stainless steel tubing (the yellow stuff) for gas. It’s far easier to work with than black steel pipe and has the advantage, like PEX for water, of being able to easily take gentle turns without having to use fittings. This saves time and money as well as increasing reliability because there are fewer connections and thus fewer potential failures. CSST comes in 25, 50, and 100′ lengths, too, so you can do a long line all the way from start to finish without any fittings except at the ends, if you do it right. That’s nice. It’s pretty easy to use, too, though attaching the fittings requires application of rather a lot of torque to get them tight. If you’re not a brute, CSST might not be for you.
I’ve started insulating the place, too. I made the framed walls 12″ thick so I could use massive R38 insulation. Why? Because it gets cold here and I don’t want to spend a lot of fuel to keep the workshop comfortable. Did I mention it was handy owning a small trailer?


These bales of insulation were kind of incredibly compressed. As shown on the trailer, those bundles are four bales in a sleeve. A single bale has 11 batts. Look at the pic on the right. You can see the end of a bale (black with white stripe) in the middle. Around it, clockwise from left, is one single bale, just cut open. The batts are still mostly pressed together, and definitely not fluffed up to their full 12″ thickness yet, and I actually count only 10 in this picture – but you can see how compressed they were! They have already expanded to 4x their original thickness and like I said, they weren’t even fully fluffed up yet! It’s kinda like those refrigerator biscuits in the carboard tubes… break the tube and the raw biscuit dough just starts to grow!
I also built a rudimentary set of steps to get in and out of the house (vs the little step ladder that used to live there). This is very much a temporary thing. I will make a nice landing deck and probably give it some cover… in the spring. For now, I just needed something to get me in and out of the house while I spend my efforts on more pressing matters.
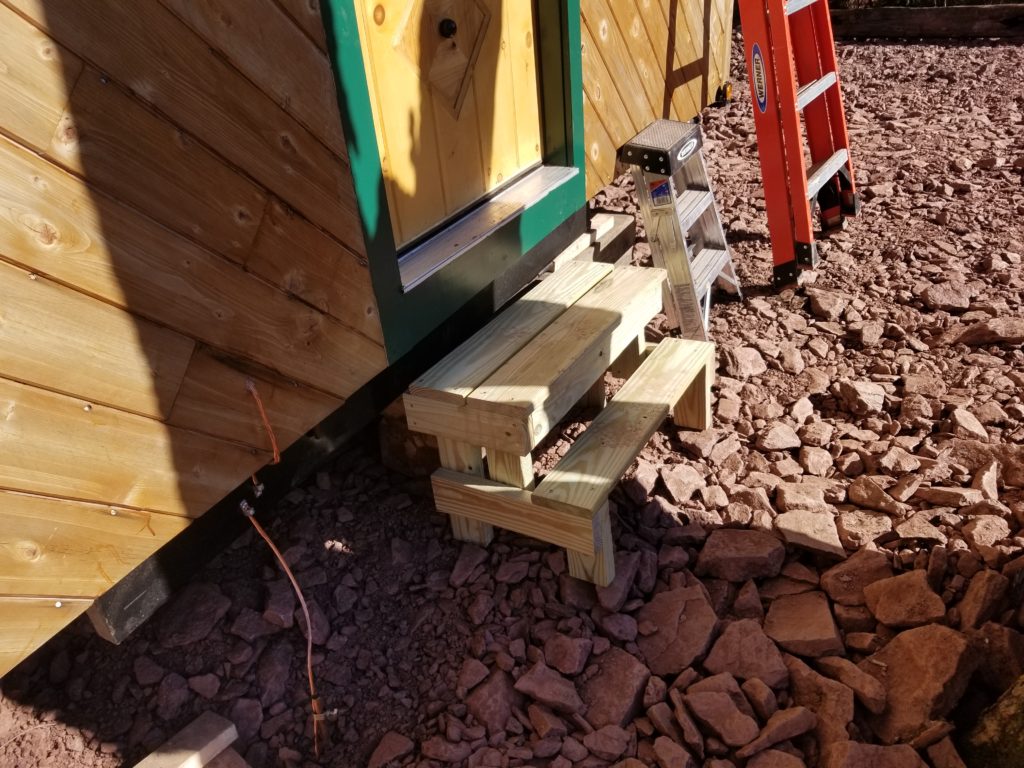
As it is, the second step is decent and the first is just too small, so I will spend a little more time on this soon to make the lower step like the upper one. Again, this is just a quickie temporary thing to get me by for now. I’ll make something nice later, when I have some time.
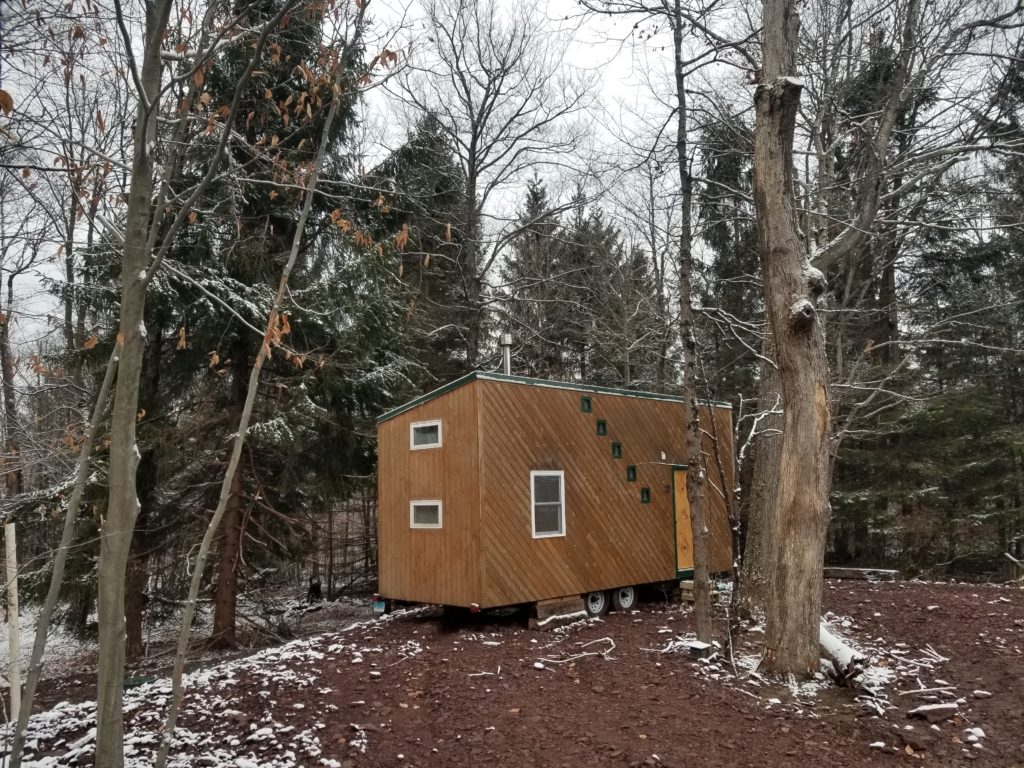
Meanwhile… snow! Just a dusting, but this has happened a few times already. I sent this picture in to my colleagues at work with the caption “now this is working remote” 🙂
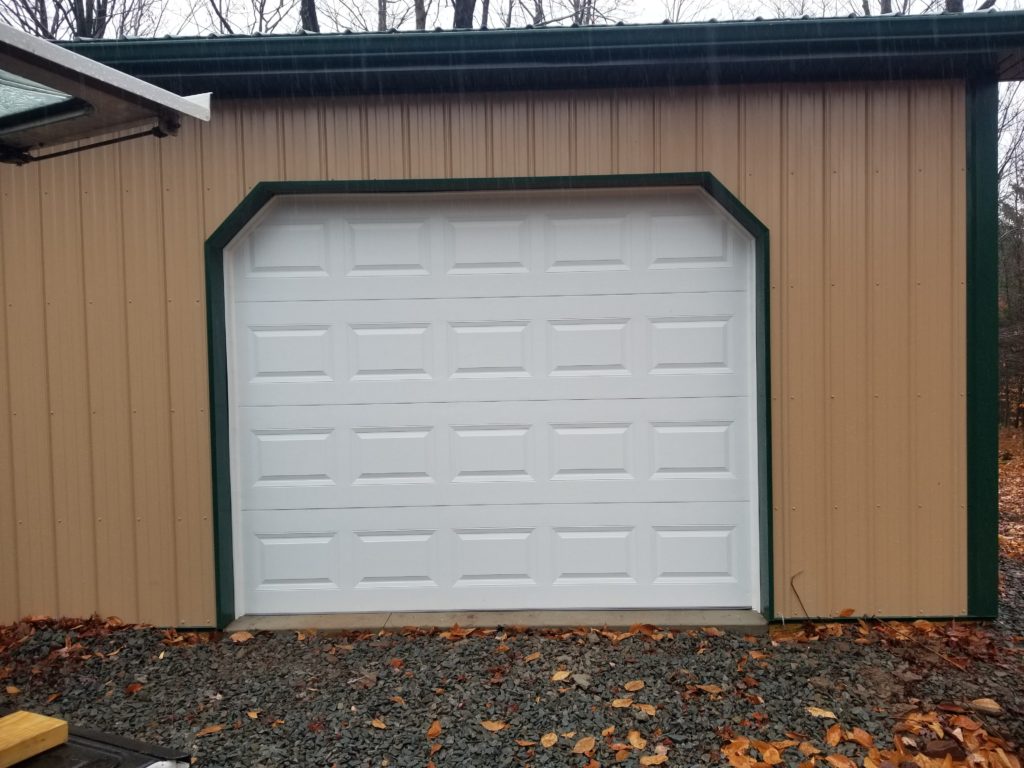
In other random news, one of my two garage doors on the W.O.G. got installed. Why just one? Well, evidently the 8×8 door, which is smaller than standard garage doors, is not in stock and due to supply chain madness, nobody knows when it will even be available. I have since built some basic barn doors out of plywood and 2x4s just to close up the hole, but I would really rather have the overhead garage door there… someday it may come?
My movers have also come and gone, bringing all my stuff and putting it in the W.O.G. This is good, because I still need to build some shelves for my cabinets and closets in the HomeBox before unpacking things into it, but it also means most of my kitchen and clothes are in boxes, piled high and deep. I’m going to have to do something about that very soon. Inconveniently, my table saw, key for making nice shelves, is deep in the piles and anyway, there’s no room for it in the workshop part right now because I have materials and tools set out for further construction of the build-out. No room for a great big table saw just yet! Especially now that there are also homegoods in boxes.


On the right, this is the view down the corridor to the tidy room. It’s about 8′ wide and at least 12′ deep from here. Filled floor to ceiling and wall to wall with boxes and shelving units and equipment. In their defense, I told the movers to do exactly this so space on the workshop floor was maximized as I finish the build-out. Still, it also means it’s going to be difficult to unpack and find individual things of present need. Even so, that’s exactly what I must do very soon, since I tire of the five pieces of clothing I brought with me ahead of the move!
Just a few more things to note today.
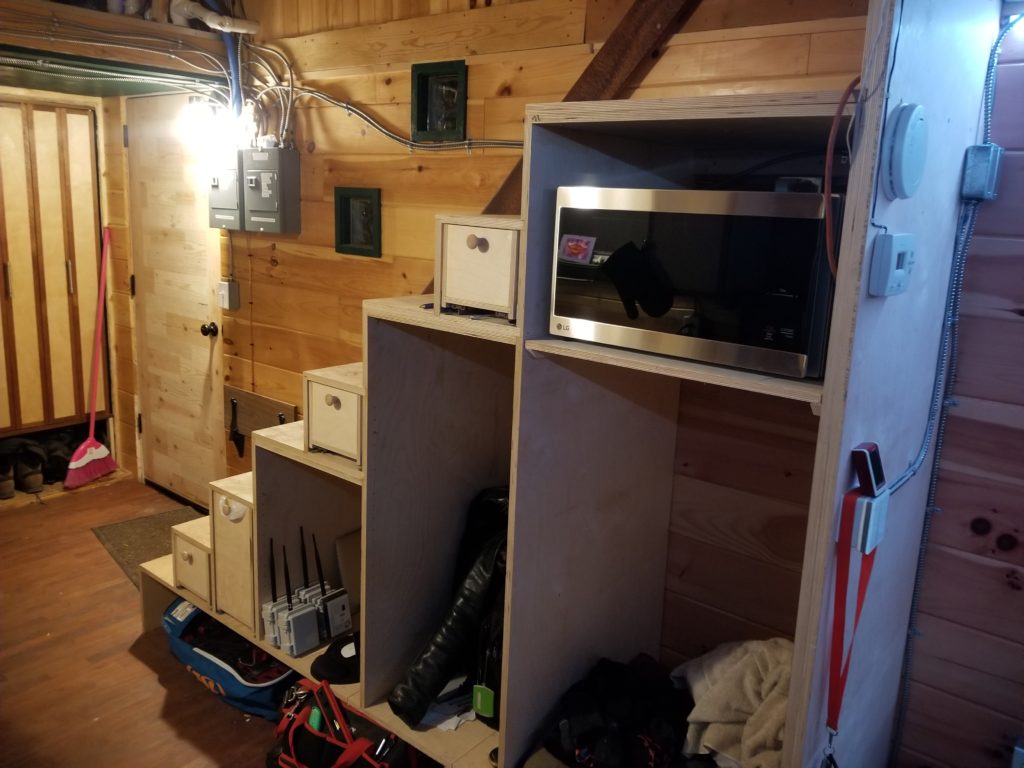
Perhaps you’ve heard of the closet under the stairs? Well, you already know I have cabinets under my stairs. but now I also have a microwave oven under my stairs. Why? Honestly, that’s the only place one would nicely fit. It’s just opposite the galley, so it’s easy enough to use in place. I didn’t love the idea of taking up cabinet space, especially right there, where I was going to have hanging storage for nice garments and such, but I have few of those and a strong need for a convenient microwave, so the microwave won and the hanging closet got shorter by this much. I can still probably hand jackets and nice shirts and pants and such in there if I wanted. We’ll see as things get unpacked.
I did add temporary pulls to the drawers, as you can see. I intend to make decorative fronts with sapele borders for them, to match the kitchen cabinetry, but not until the workshop is operational. Until then, a simple wooden knob will do. Honestly, they don’t look bad just like this, but it’s not the look I want. I also want to add some nice maple treads to the stairway, not just leave it as cabinet plywood. That, too, waits for the workshop to come back online.
There’s a little more to tell but that’s enough telling for today! What remains I’ll just bundle with the next installment 🙂