While taking a nice break from HomeBox design & construction, I’ve not been totally idle in terms of homestead-related activity. Most recently, I have just completed the design for the Haulable Horizontal Honeybee Hive House.
What’s a Hive House? It’s a little house with bee hives in it. My 5H is was inspired by the Slovenian Bee House concept (you can look it up to learn more), where the hives are built into the wall of a shed, using special hives with rear, rather than the conventional topside, access. The result is the apiarist can service the hives from inside the bee house, protected from the weather and other wildlife. The hives themselves are considerably more bear-proof, as well, since they are no longer free-standing and exposed, but built into a larger structure. Since the bee house really is its own shed, it can have storage, work stations, etc., to facilitate hive management and honey harvesting. Pretty cool, eh? Yep. Those Slovenians got it going on when it comes to honeybees, no question.

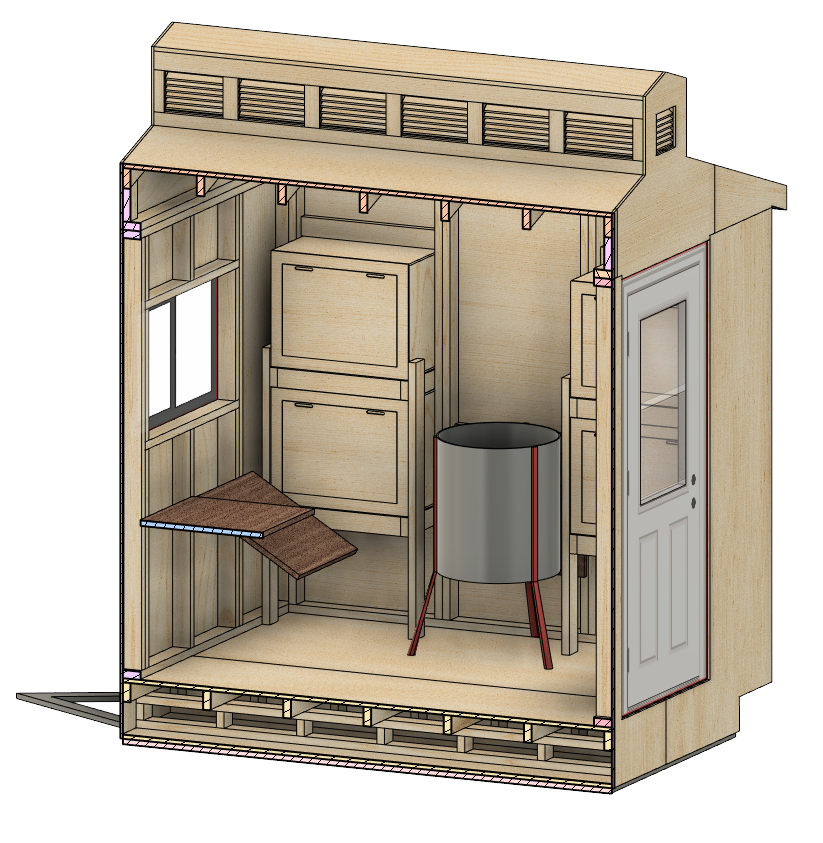
This is the model, sans siding, and with a simple approximation of the trailer bed for reference. We decided we wanted the hive house to be built on a trailer base (hey, that’s starting to sound familiar around here, isn’t it?) so if the homestead site out in the middle of somewhere doesn’t work out, we can take our bee house, along with our people house, on the road. Utility trailers tend to have 5×8 decks and I had no interest in custom building the trailer aspect of this, so I designed the hive house to mount to such a utility trailer. The thing is, a 5′ wide hive house, once you also count the hive depth inside the building, would be more like a corridor than a house. This is why I built a scaffolding to raise the hive house deck to clear the wheels and then cantilevered it out a foot on either side, giving a 7×8 foot print. That’s still modest for a shed, but workable.
The hives customarily used with the Slovenian Bee Houses are called AZ hives and are related to the stacked-boxes style called Langstroth. We are already using (and like) a hive style called Layens, which use much larger frames but do not stack the way the Langstroth ones do. The point here is the AZ hives, which are already rear-access and therefore hive house ready are not compatible with the frames we’re using now. Ideally, we’d like to be able to interchange the frames, facilitating both the transfer of the colonies from the existing Layens hives to the hive house as well as going back, if for some reason it turns out the hive house doesn’t work out. And anyway, we like the larger Layens frames and their single-decker colonies. What this all comes down to is that there is no rear-access Layens hive designs out there, as far as I could find, so if that’s what I want, I’m going to have to design them myself. And so I did. I’ll get into that in a bit.
Referring to the picture above, you can see the hives just a little proud of the plywood sheathing. That’s intentional. There will be some dress siding that takes up most of that depth. A tiny bit of protrusion will remain, which is also intentional, for visual interest.
Here’s a cut-away showing the primary work station (split drop-leaf table), two of the hives, and our honey extraction centrifuge. The hives will probably have a handle and latches on their rear doors – I just didn’t put that in this model. The reason for the split drop table is that the lower hive can’t be accessed when the table is up. The lower hive can’t be raised any higher because then the upper hive would be too high to comfortably service. As is, it’s close to eye height for M. The drop leaf table was the compromise. There are additional drop leaf tables, one each between the banks of hives, which can be used for temporary placement of anything, intended to be especially useful when the main work station is half dropped.
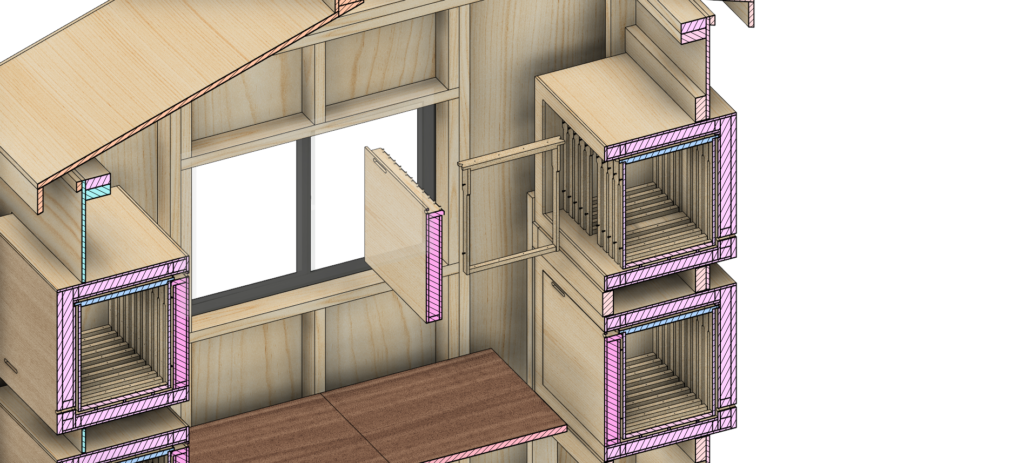
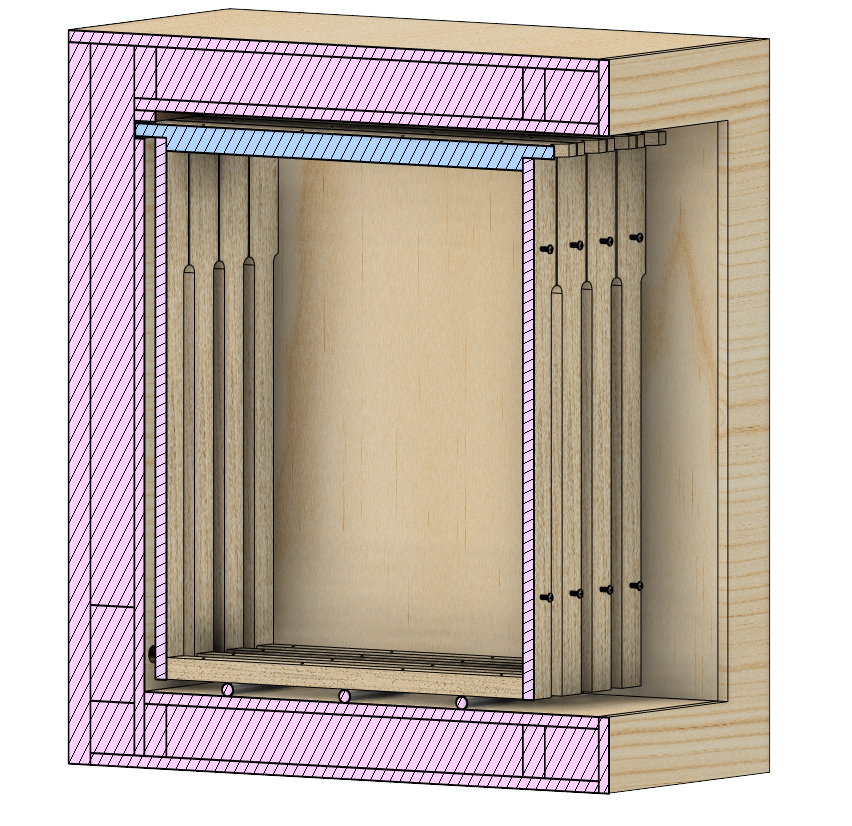
Here’s a section view showing one of the hives open for service. You can see the thick walls of the hive boxes (and access door) — these are actually 1/2″ plywood with 1.5″ of insulation between them. Unlike a solid wood hive (such as the ones we are currently using), these are expected to be far easier for our bee friends to keep comfortable. They spend a lot of energy maintaining the perfect environment in there – the insulation will help them the same way it helps people houses. In the case of the honeybees, though, this has another important aspect.
To keep from freezing in the winter, honeybees cluster in a tight bunch and basically shiver to give off heat. They’ll rotate through the depth of the cluster to keep themselves warm, but everybody takes a turn being on the outside as well as the inside. To fuel all this hard work of keeping warm, the bees eat the honey they made and stored over the summer. This is why the conscientious apiarist doesn’t harvest all the honey they find in the hive. You leave a lot of it for the bees to use for winter food. Sure, you can give them sugar water instead, but the honey is far better for them and is anyway more natural. If the hive is insulated, it’s a lot easier for the bees to keep warm and thus they don’t need to metabolize as much honey and thus more honey is available to harvest responsibly.
There are other benefits, as well. All that metabolic action generates waste (bee poop). When it’s so cold and the bees have to cluster (for many months uninterrupted), it’s also too cold to “go for a cleansing flight” — a/k/a take a poop outside — so they have to hold it. Yeah, really! They can, which is good, but for sure the harder they’re working to keep warm, the more they have to hold. If spring comes late and winter was hard, it can be fatal if they don’t get a day warm enough to fly out for some bee-bowel relief before they reach their holding limit. Insulated hive = less work to keep warm = less honey metabolized to fuel the effort = less poop made = less poop to hold = better chances of making it til spring without exploding. Also, bees don’t generally die of age so much as they wear out. In the summer, when they’re making endless runs around Nature’s bounty, they live for only a few weeks because of all that mileage. In winter, they’re not flying, but the shiver-warming takes its toll (please have exact change). Insulated hive = less total effort expended = longer life. This means when spring comes, the bees who made it are less worn out than they would have been in a non-insulated hive and can therefore get on with spring business more effectively, getting the food stores replenished and starting up the nursery for the new year. There’s lots of good reasons to have an insulated hive.
Let’s finish up with the hive house before going too deep into the hives themselves.
Here’s a roof-off view showing the whole thing.
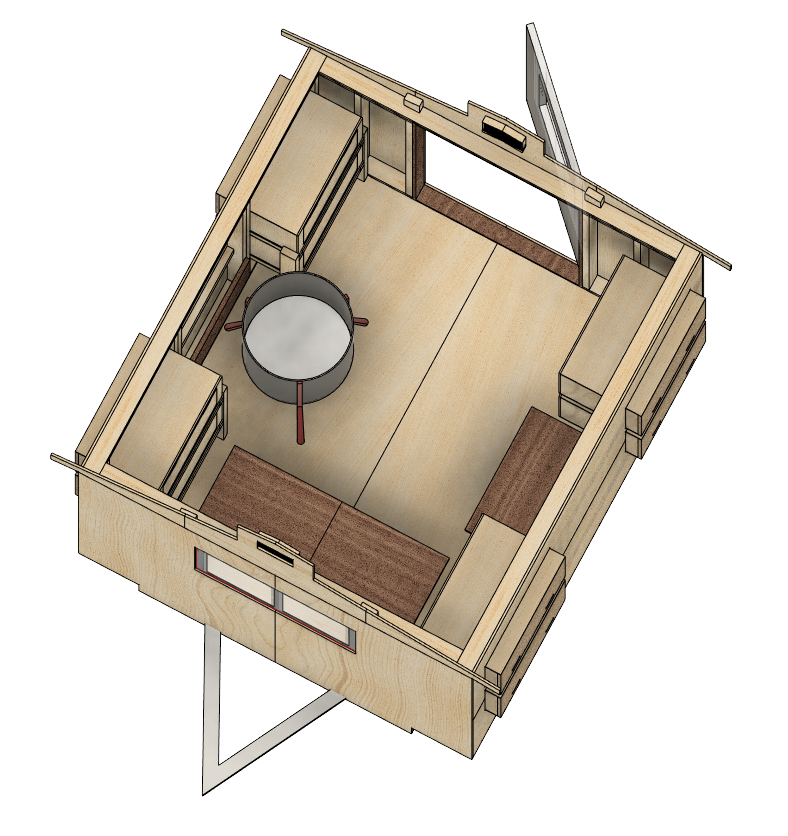
You can see the auxiliary drop-leaf tables on the left (dropped, behind the extractor) and right (in-use position). The idea is the extractor will be on a dolly and shoved around out of the way as needed for working the hives on the other side of the house.
Lastly, that cupola is not just a charming architectural feature! If that’s all it needed to be, I’d have made it much smaller. No, this is an important ventilation feature of the bee house.
Nectar is converted to honey both with enzymatic action (go go gadget bee spit!) as well as evaporation. That evaporation means a lot of moisture gets released — and it has to go somewhere. The process has that in common with maple sugaring, though on a much smaller (and cooler) scale. If the bee hives are inside the bee house, that water vapor needs to get conducted to the outside, otherwise the interior of the bee house is going to get nasty.
To mitigate that, I have designed in a two-part ventilation system. The hives have their entrance low on the outside and their vent high on the inside. This provides natural convection-driven air flow (blue arrows) through the hives, taking the water vapor out. We can reasonably expect the (uninsulated) hive house to be warmer in general than the hives themselves, so we can count on that convection in the summer when it’s most critical.
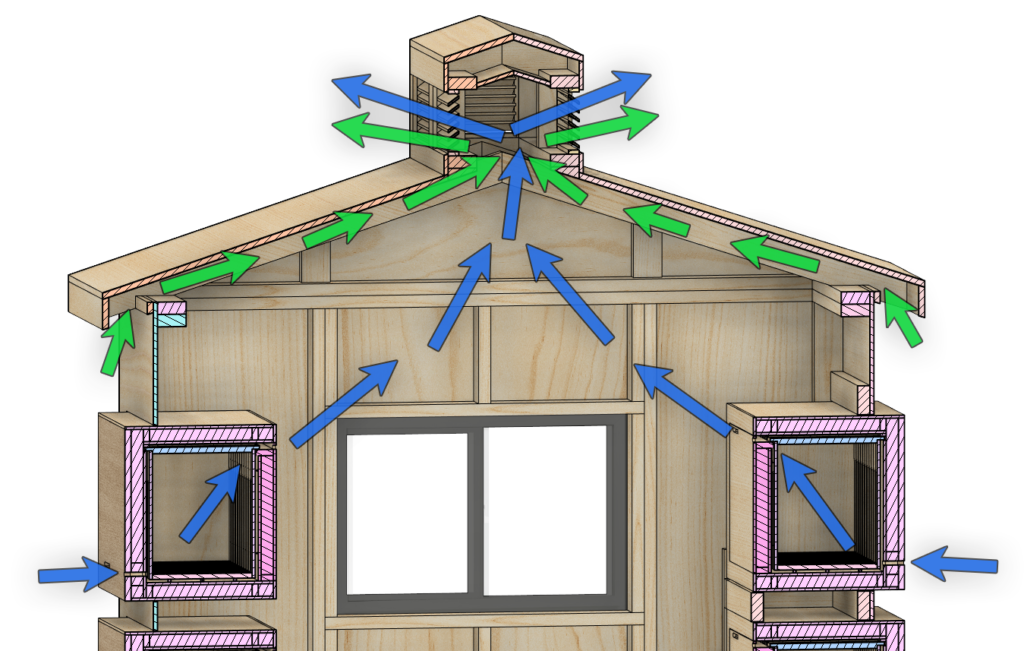
The flow through the hives themselves, though sufficient to humidify the interior of the house from the hive exhaust may not be sufficient to drive that moist air out of the house, especially in the summer. That’s where the second system comes in. The soffits of the eaves will be essentially open (though screened to prevent pest intrusion), such that as the house warms, a larger convection current (green arrows) will draw the moist air out as well as keeping the rafter bays dry. In the winter, because it’ll be so much warmer inside the hives than out, I’m confident the warm, moist air from the hives will find its way all the way out.
If that turns out to be insufficient draft, I can add a screened vent down low where there would be a more significant temperature gradient to encourage convection. And if that turns out to be insufficient, I can always add a fan in the cupola and a solar panel on the roof run it. It’s rare that I don’t have at least two or three plans for anything 🙂
I’m not an expert in house design (this is only my second and the first one has humans in it who can open windows and use fans if it gets too humid), so this is my best guess rather than some precision engineering or drawn from best-practices wisdom. Still, I think it’ll work.
So, about those hybrid Layens hives – how did I convert them to rear-access? I started with this free design for an insulated (top-access) Layens hive, reverse-engineered it to discover its key concepts, and got busy with my CAD program (Fusion 360, if you’re curious) to see what I could do about adapting those concepts for a rear-access design.
In a top-access hive, the frames have shoulder tabs which rest on the upper edges the box. In a rear-access hive you can’t do that because you’ll remove one of those rest-edges when you open the door, making rather a mess of things.
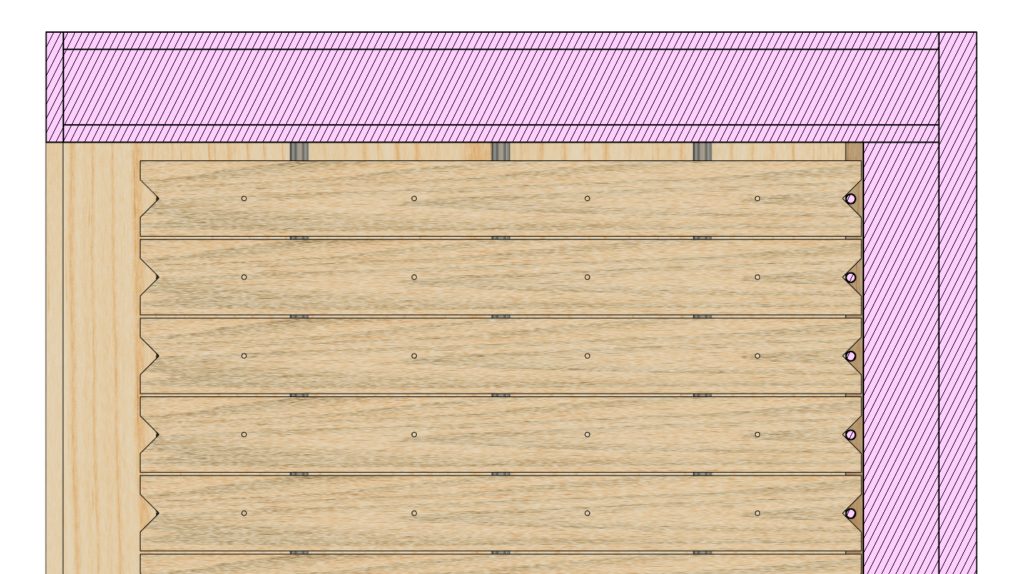
The AZ hives solve this problem by supporting their frames from beneath rather than hanging them by the tabs. I followed that example. In this cross-section, you can see three brass rods along the bottom of the frames providing support. That’s enough to keep them level and allow them to be slid out easily. The narrow gap where the front tabs fit should be enough to keep the frames from toppling over to the side when the hive is not full. What the gap and brass rods won’t do, though, is keep the frames properly spaced horizontally.
To maintain spacing, I cut notches in the top bars and engage them with pins in the hive body. These will auto-center the frames as they are docked, as can be seen to the right in the top view (cover removed) shown below. But first, what are those screws for? They’re for grabbing the frames! I envision making a tool with keyhole slots and a handle which can slide over those screw heads, lock onto them, then securely hold and pull out the frame, allowing the use of a bit of force if needs be (sometimes the bees will put sticky stuff around the frames, making it harder to extract them) and providing a convenient handle to the frame during maintenance.
The astute observer will notice the pins in the front (right of image) align the front of the frames but there’s nothing to align the backs. Ah, but there is! The rear door is not shown in this image. See it below, with a corresponding set of pins.
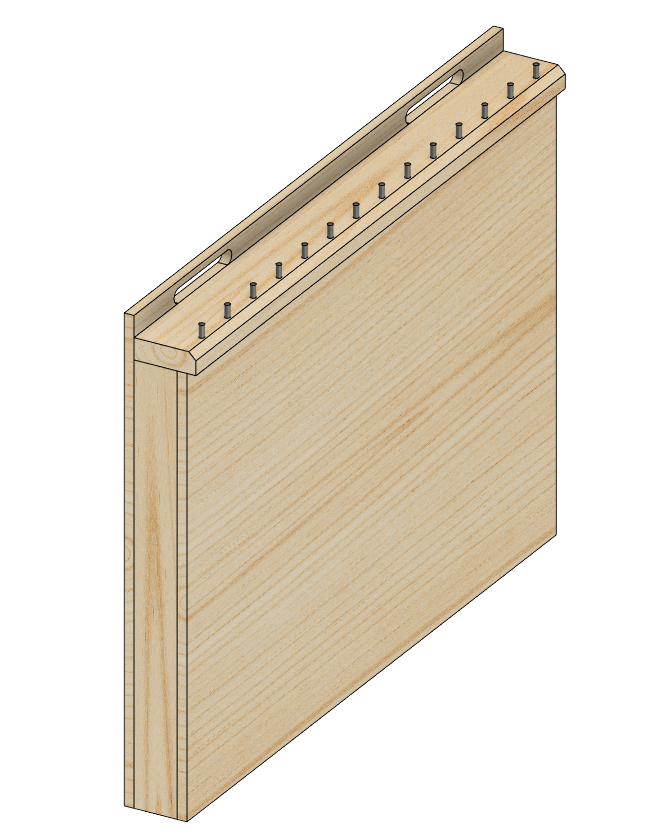
Those pins will engage the notches in the rear tabs and keep everything perfectly spaced. The slots at the top of the door are the rear vents. They will be screened to keep the bees from flying into the bee house uninvited. Obviously, when the cover is off, they may well enter the bee house, but when the cover is on, they can only come and go to the outside via their hive’s front entrance. If bees come into the bee house when the cover is open and do not return before it is closed, all we need do is open the hive house window and they’ll find their way back home through their hive’s front entrance (after making an escape via the window).
So there you have it – the Haulable Horizontal Honeybee Hive House. If I have time, I hope to make one of these insulated hives in the spring and test it out with bees before committing to building this whole project (next year, after moving, at the earliest). The hives have a lot of precision parts, so they’ll take some care to manufacture.
Do you want one of these?
Here’s the thing: the hive design, while based on what I believe to be sound principles and proven existing designs, is, in fact, an untested design. The bee house is totally of my own conjuring and may or may not prove effective, road-worthy, weather-worthy, decently ventilated, etc. I know a lot of things about a lot of things and have done my best to make these fit-for-purpose, but I can’t make any promises about an unproven design. Also, I have zero interest in producing any of these houses or hives for sale at this time, so you’ll not be buying one from me, even an unproven one.
However! In the interest of paying it forward, supporting pollinators and the humans who care for them, encouraging makers, and generally being a generous human, I offer you the Fusion360 model archive under the terms of Copyleft (basically, you can do what you want with it but any modifications must be likewise made freely available without restriction) with the caveat that I ask that you give credit to “Daniel B. Singer” for the original design and I will not be offering technical support.
In short: here’s my work, you can use it, please give me credit, and you’re on your own. Fair enough?
The archive includes both the house and the detailed model of the hives, which also includes the frames. I’m not an expert in Fusion360, so the model isn’t as technically wonderful as it might be, but it has all the relevant parts as individual solid bodies and should be buildable and true to dimension (with the caveat that plywood is shown at nominal thickness, not absolute true thickness — it shouldn’t matter in the ways it has been used). There are no bills-of-materials or assembly drawings; it’s only the solid model. I’ll probably write up an Instructable for the hives, at least, but that will be whenever that will be, which has not been yet.
So here ya go, the Fusion360 model archive. Use it in good health and happy building & bee stewardship.
There’s a decent chance I will revise the model in the future, as well as write up some instructional materials for how to fabricate and assemble things efficiently, but that’s a job for the future.