This post isn’t about the HomeBox directly, since that’s on hiatus for the winter. However, everything in the HomeBox has to get made somewhere — what happens in the workshop is part of the story. And anyway, I wouldn’t want you to get bored waiting til spring for a new construction post so I shall regale you with tales from the winter workshop improvement initiative.
Winter has been slow to get really cold, so while it’s definitely too chilly for big projects or anything that requires chemistry (glue, finish, caulk, paint) or things being not-brittle due to the low temperature, it’s not too cold to be in the shop doing things which aren’t too demanding, especially if I put on my flannel-lined pants (so cozy) and my shop fleece (which is like an ordinary pullover but irretrievably covered in sawdust).
Inspired by the setup at the Connecticut Valley School of Woodworking, where I’ve been taking some furniture-building classes, I decided to put the table back in “table saw” and build this enormous outfeed table.

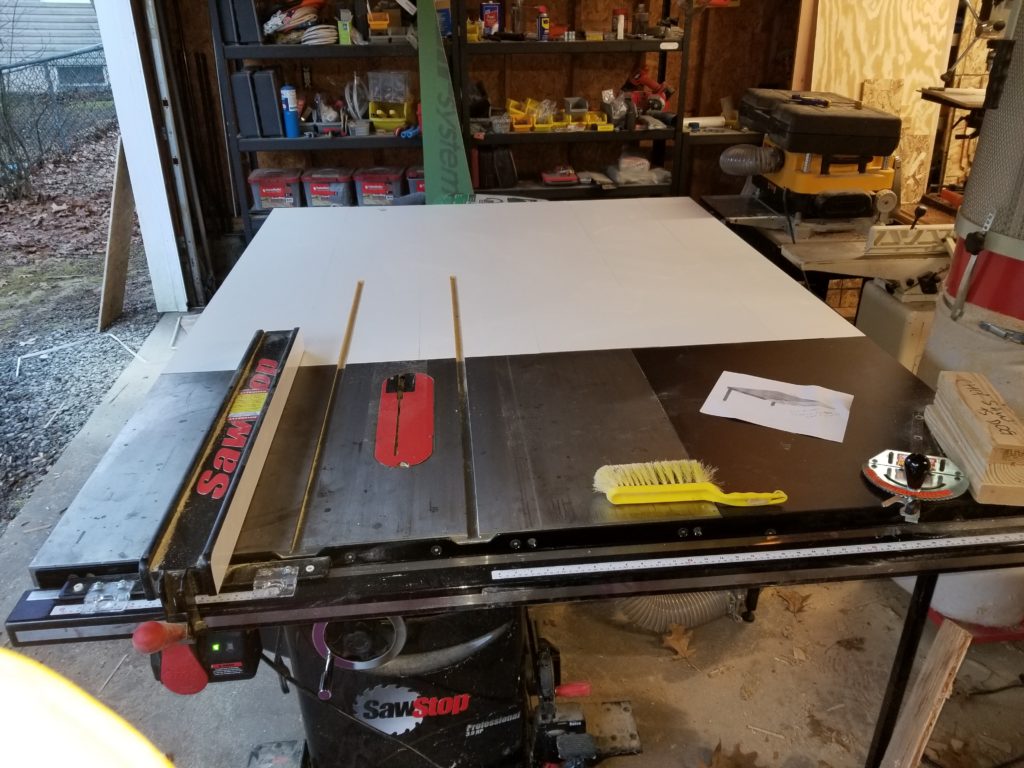
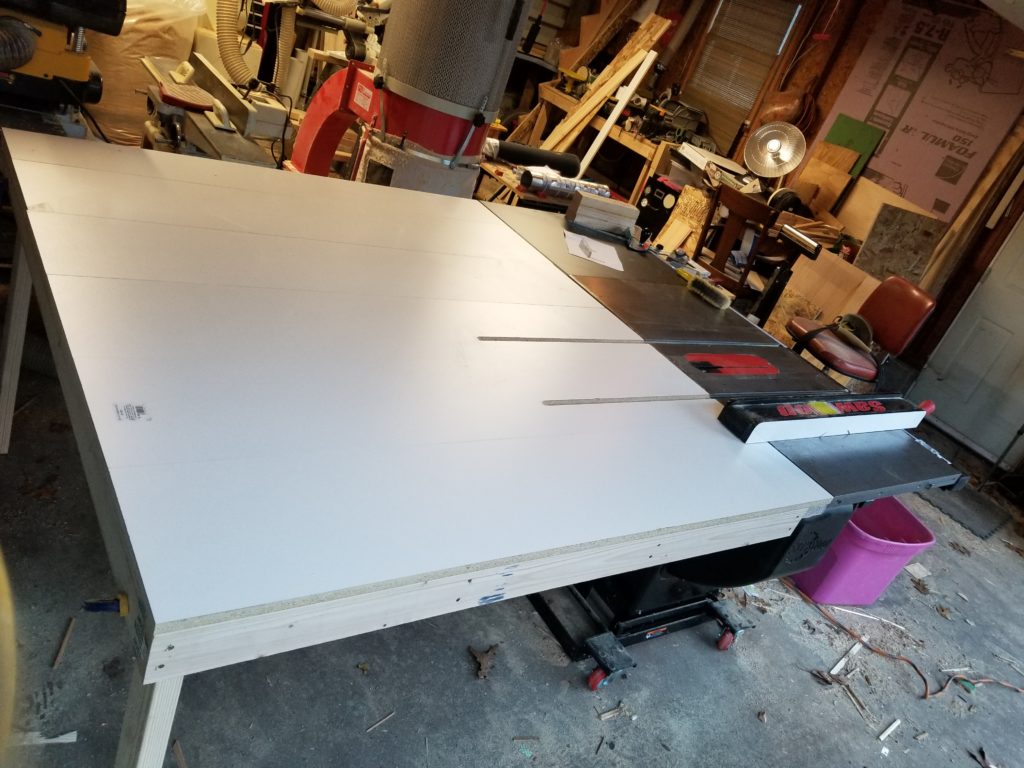
Everything that’s white was added today. The surface is 68″ wide to match the existing saw deck (cast iron, left) and extension table (black surface, right) and 5ft deep. Strategically, this means even 4×8 sheet goods can be fed through this set-up and stay more than half supported past the blade, meaning it won’t teeter off the far edge. As strategically placed in my workshop, there’s actually room to feed a 4×8 sheet from the front if desired. The top is laminated with Melamine, making it good and slidey and moderately resistant to abrasion. Actually, though it’s hard to see here, these are 6 sections of pre-fab shelf blanks from Home Depot. I actually wanted to use a big sheet to minimize joints but there were logistical issues with that — and anyway, those full sheets are freaking heavy and I’m glad I wound up using the foot-wide units I got. I arranged them lengthwise such that the seams could not catch anything. Good enough.
You’ll notice the miter slots on the saw deck are extended an equal amount into the new table. This will allow the runners of any jigs, crosscut sleds, miter gauges, etc., to seamlessly flow past the blade. One thing I’ve learned in class is that there’s a lot of cool stuff one can do with a table saw if one has the right fixtures.
Until today, I used roller stands placed behind the saw to catch and support work as it exited the saw. That worked decently, but they must be constantly re-positioned to accommodate different lengths of things being fed to them, sometimes work would sag before it got to the stand, they’re only 16 inches wide (not so great to support wide pieces), and they generally presented a tripping hazard with their splayed legs and big feet. This enormous outfeed table will support any length or width of stock I can actually maneuver in my workshop, so it’s guaranteed to be sufficient all the time. And with just two straight legs under the tabletop (the other side is supported by a lip on the back of the table saw itself), no tripping hazard.
But what about all that space below the table? Isn’t that a ton of wasted volume?

Heavens, no! The space formerly taken up by the splayed legs of the roller stands is now freed up and wide open. There’s room under here for large format storage (anything 48″ wide and less than 70″ long fits easily). The side here is right in front of the garage door, conveniently (it’s like I did this on purpose), so it would be easy to move large stock in and out of this bay.
I’ll probably make a two-tier storage system under the table. One big open rack for flat stuff like off-cuts from sheet goods and some other organizer for smaller things. Or maybe store a bunch of tubs/totes under there on a roll-out platform. I could build in a shelving unit or chest of drawers, too. Lots of options. Definitely not wasted space. Indeed, this space was previously unusable because the roller stands dominated and fragmented the whole area and they had to be free to be moved around. Now with the big outfeed table, all that volume below the level of the deck is freed up. As I continue the winter shop improvements, I’ll figure out what really needs to be here.
The outfeed table will serve more than just the table saw, too. If you look closely in the second photo, you can see my little jointer (perpendicular to the table, long narrow cast iron surface just past the red neck of the dust collector). I will raise that machine up on blocks just enough so that work coming off the jointer will be supported by the big table.
You wouldn’t recognize the thickness planer from the little yellow corner that’s showing in the upper left of that photo, but that guy, too, is a candidate for having its position adjusted so stuff coming out of it is supported by the big table. One ginormous outfeed table, three machine tools accommodated. Actually, if you go back to the first picture, you can see both the planer (with an unrelated black box on top of it) and jointer pointing right at the side of the table, as if yearning to use it.
More shop improvements to come.