There’s something sweet about typing “home” in my browser bar and being brought directly to this blog. That’s the nifty thing about having the domain “HomeBoxLife.com” — autocomplete is happy to take me there just by my typing “home”.
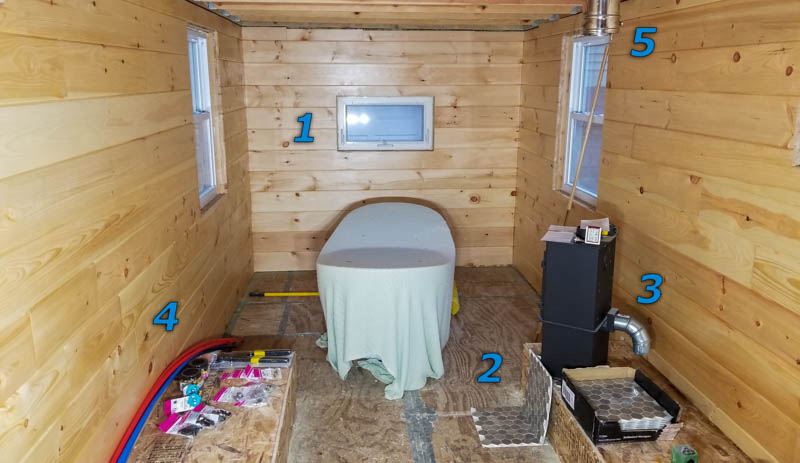
This weekend’s activities are largely invisible, but Very Much Work has been done. Allow me to direct your attention to the numbers in the photo, above.
[1] The walls of the lower level living space (for those of us nerds who spend too much time interfacing with Bluetooth stacks, we might be tempted to call it “L3S” or “L3Space”, and while I am, in fact, that nerdy, I am not, in fact, gonna — you may thank me later) have been relieved of their sanding dust and have received two coats of dissolved lac bug secretions. The appearance of the walls hasn’t changed much, really. They’re a shade or two darker and they have a very slight satin sheen, but mostly they still just look like yellow pine boards. This photo I think shows them a little warmer-toned than actual. Anyway, this is perfectly fine. I don’t need the yellow pine boards to look like anything other than yellow pine boards. The shellac will seal them against moisture, of which surprisingly much is produced in a tiny house (cooking, breathing), and offer a little bit of mechanical protection, as the shellac dries hard.
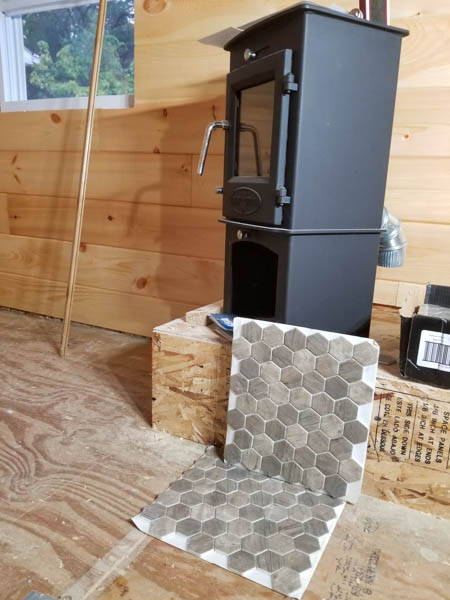
[2] I’ve been thinking about the hearth requirements for the wood stove and have decided that what would look best would be more of those hex tiles I used as decorative accents in the bathroom. Because the wood stove is (and has to be) in this particular location, it is subject to the oddness of the wheel cover box upon which it is situated. As such, the hearth will actually have a step.

The hearth will have to extend into the main corridor a bit, which again is a little odd, but hey, have you met me? I have toyed with the idea of making the hearth footprint essentially a half circle, which might look kinda nice, though it would also be a fairly big bother. I drew it out on the floor and because the wheel box projects a bit into the space, the circle really has to be a 3/4 circle, but the center of that circle would have to be in a totally arbitrary place with respect to the stove itself in order to have the terminal ends land square to the wall and the wheel box. That crazy 3/4 circle might just look wrong no matter what I do simply because its center doesn’t have any conceptual relationship to the position of the stove. I may need to spend some time laying this out more carefully to see what the options are.
In any case, here’s a couple of sheets of those hex tiles (they’re called “Driftwood Hexagon”, if you care to pick up a pack for yourself at your local HD) laid out where they’d have to be, just to get a sense of the aesthetic. Note that the vertical faces of the wheel boxes will need to be dressed in tiles, too, as shown.
M thought that putting the stove at a diagonal would make it easier to enjoy sitting “by the fire”, since what constitutes “by the fire” would no longer be limited to just the rear-right corner (where the stove formerly faced) of the BeDeLiA but would now effectively be 2/3 of the back and the left-rear corner. It’s likely to be more comfy at a little more distance away, anyhow. The reason this is relevant today is that now that the walls are finished, I can check the stove-to-wall clearance for this proposed orientation to ensure minimum distance for fire safety. Rotating the stove caused one of its corners to get closer to the wall than my original plan. I am pleased to report that the accumulation of “add one more inch for good measure” during my original layout process has paid off and the fact that a corner of the stove is now meaningfully closer to the wall than before does not violate the safety clearance. It’s within an inch of too close, but it is not actually too close. I know these fire safety clearances start out very conservative and already have safety margins built in so I am not at all concerned that I the corner of the stove is only getting close to what is already an established-with-an-abundance-of-safety limit.
You may be thinking that the stove as placed really is too close to the wall… and you’d be right — if I don’t do anything else — but I plan to do something else. That something else is the installation of a heat shield with air space on both sides. That prevents the radiant heat thrown off by the stove from impinging directly on the wall. Instead, it hits the shield, which has air convection spaces on both sides, disrupting that radiant heat and circulating it into the room rather than having it hit the wall (and catch the wall on fire). The leeward side convection also serves to both cool the wall and the heat shield, as well. Such a shield may be made of sheet metal or cement board. I haven’t decided which yet. The cement board is easy (one can just buy some) but sheet metal, which would have to be fabricated to fit, would probably look a lot better, especially if it were black like the stove. I don’t actually know whom to speak to about getting a corner of sheet metal, but I wouldn’t imagine it to be too difficult to locate a shop that can fashion this for me.
[3] What’s this? A junior-sized dryer vent? Nope. This 3″ duct elbow is connected to the air intake for the stove. Combustion requires oxygen. A tiny house doesn’t have a lot of oxygen it can spare for a raging fire. Where does the air in a house come from, mostly? It comes from little spaces around doors and windows or imperfections in the overall envelope of the house, etc. This little house is actually sealed up pretty well and because it has relatively few opportunities for fresh air ingress, a special intake is needed to provide the stove with air for combustion purposes. And anyway, even if the house was loose enough to be able to keep the fire supplied with oxygen, that would create a net negative pressure in the house, causing outside air to be drawn in through whatever avenues it could find. That’s all well and good until you remember that the reason the fire is going is that it’s winter. That outside air is cold! Letting the little cracks in the house supply the fire with oxygen is literally sucking cold air into the house on purpose in the winter. No, thank you. Why would I invite a draft into my living space? I wouldn’t. That’s why there will be a separate intake just for the wood stove. Yes, when the stove isn’t running, that duct may get pretty cold (and slightly chill the area around it). But you might also imagine that if it’s cold enough for that duct to be so cold that I would care, it’s also cold enough to be running the wood stove, which means I will no longer care about the duct.
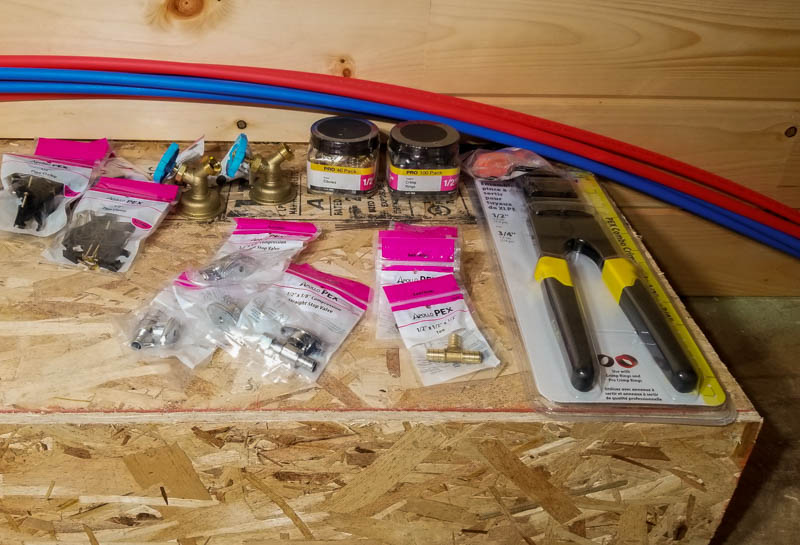
[4] I also bought a bunch of PEX plumbing supplies today. I’ve used PEX before (well, okay, I used it to make a couple of hula hoops and a ring for an over-sized dream catcher) and I like it. I certainly appreciate how quickly and easily it goes together – no fire, no neurotoxic solvents. Because it is so flexible, you really don’t have to think too hard about perfectly aligning everything. My only sadness today was realizing that my PEX tool is for 3/4″ systems (only) and the HomeBox water system will be a 1/2″ system. Sigh. I bought a new PEX tool ($60) which does both sizes. While that’s good and convenient, it also makes me a little sad that my prior PEX tool (which was probably comparably priced) got so little use and is now redundant. Maybe I’ll put it in the Habitat for Humanity donation box.

Shown here: 60 feet of pipe (or, more precisely, the middle 2 feet of each of 6 ten foot pipes), elbows, tees, tie-downs, some valves, crimp rings, that new crimping tool, and a couple of garden hose faucets. Why two? Well, one for cold water and one for hot. Wait. What? Hot? Sure. They don’t just go to the garden hose (which rightly should just be cold). They also supply what will become the outdoor shower. We definitely want hot water for that 🙂 We’ll fit a splitter to the cold line so the garden hose can be used any time without having to swap it with the shower’s cold feed.
[5] It just looks like the tail of the flue, but actually, the flue is 20″ longer today than it was yesterday. I had a 20″ section of flue pipe in the basement just waiting to be installed. No reason to leave it there. And now that the location of the stove (and more specifically, it’s distance to the roof) is settled, I know how much more flue pipe I need to buy to complete the project. The answer, because I know you’re curious, is two sections of 40″ pipe. One for inside, to complete the riser, and one for outside, to get the top of the chimney to the proper distance from the roof deck. Right now, there’s just a stub there and a cap to keep out the weather. The full height flue would be too tall to get under bridges (remember, this is a trailer!), so that last section needs to be removable.