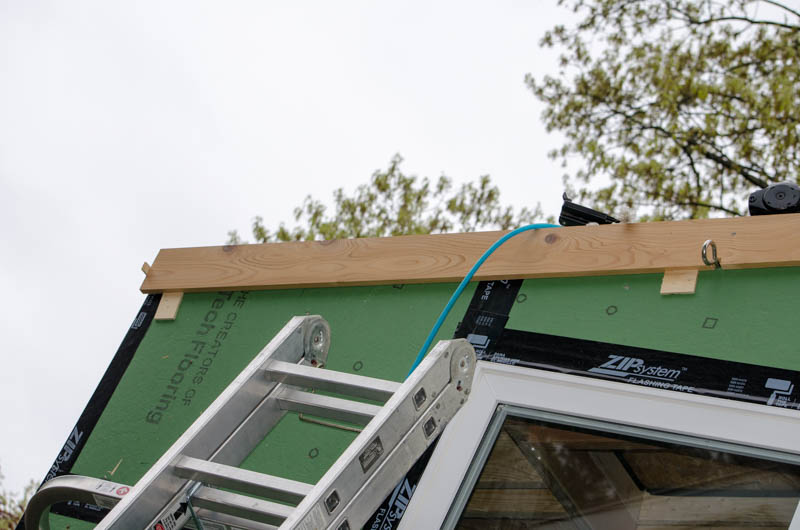
There is approximately 70 linear feet of top trim to be applied to the house. 24.5 of which are at 11+ feet of elevation. 24.5 of which are at 13+ of elevation. The balance are the end walls, which span the lower height to the upper one. The tricky bit is how to install this trim safely.
At first, you might be tempted to lean over the edge and do it from above… but that is probably the least safe way to do this dangerous job. First of all, it’s intentionally leaning over the edge of a high thing, holding some awkwardly-shaped weight (the board) such that its natural weight pulls you in the direction of falling (down). Secondly, one must aim the nail gun toward the face of the house, which is also generally TOWARD THE OPERATOR. Never do that. So, no. That’s not going to work. Okay, then, up the ladder it is.
But then you have to manage things like how do you keep the board level and support its weight across a 9+ foot span such as this (about 5 feet shown) when you can only safely access about 2 feet at a time from the top of the ladder? The answer, my friend, is cleats and stops. Note the little blocks below the board. These are plywood scraps tacked on to the sheathing board at exactly the right height and angle to locate the trim board exactly where I want it. See that little stub sticking out in the left of the frame? That stops the low end of the board flush to the edge so I can be at the high side, guiding the board onto the cleats and pressing it gently to the face of the house. The cleats hold it up, the stop lines it up, and all I have to do is drive a nail or two to hold it (nail gun pointing properly AWAY from me).
So why did this process actually take All Day To Do? Let me spell it out for you:
1. Locate suitable plywood scraps. Cut into cleats. Machine a small blank of trim board to use as guide jig.
2. Position ladder. Shim ladder (the ground is uneven). Climb ladder with staple gun and blank and cleats in the tool belt. Lay staple gun on roof.
3. Using guide jig, find position for cleat. Hold cleat in place with one hand. Place guide jig on roof with other hand. Reach for staple gun. Tack cleat with two staples.
4. Descend ladder with staple gun and guide jig (on the long walls, the cleats are too far apart to just leave them on the roof — on the short walls, as shown here, they are close enough together that leaving the tools on the roof is viable).
Repeat steps 2 ~ 4 twenty times. This also includes changing the length of the ladder a few times. Did I mention the ground was uneven? Very.
5. The trim boards are actually the same stuff as the regular T&G siding, but the trim has the T&G cut off. That’s two passes through the table saw per board. Also, the short wall pieces are angled to match the roof pitch at each end. That’s two passes through the chop saw. On the long walls, those pieces need a bevel to match the roof pitch. So some times through the table saw it’s a straight cut, others it’s a bevel. Every cut or two, the angle needs to be set differently.
6. The end boards are single pieces. The long walls have 3 or 4 per. Each of those gets a scarf cut where they meet their neighbors (45 degree bevel so they overlap rather than abut). That’s a trip or two through the chop saw, including setting the bevel.
7. The board stock is 16′ long. No way I’m going to apply boards that long from a ladder, cleats or no. So each board gets cut approximately in half first. That’s a trip through the chop saw (no bevel – or reset after using the bevel on a prior cut).
8. Position ladder. Shim ladder. Climb ladder with nail gun and board. Set board on cleats and stops. Check fit (generally, it fit, occasionally, little tweaks were needed or I’d discover I put the bevel in the wrong direction). Drive 3 nails. The board may be 7 or 8 feet long, but I can only safely reach about 2 ft from the top of the ladder. Leave nail gun on roof. Descend ladder.
9. Move ladder 2 ~ 3 feet. Ascend ladder. Retrieve nail gun from roof. Drive a few nails. Use a flat bar to pry off cleats as you go. Use a pointy thing to extract stubborn staples. Descend ladder.
Repeat step 9 about 3~4 times per board. For each board, return to step 5.
So, yeah, somehow all this up-and-down, plus multiple machinings per board, wound up consuming an 8 hour workday. It amazes me that it took so long, but working *fast* is just stupid when doing ladder work.
The good news is this is the hardest part of the siding job, I think, and also now enables completion of the roof, whenever that’s ready to go. Next up: corner boards, then, finally, filling in the field (which will also involve opening the light ports and installing their glass when I get to that side).